A Wandering Elf
  • A Wandering Elf
  • Blog: My Journey
  • Iron Age Celtic Studies
  • A Wandering Elf in the Woods
  • Classes
  • Resources: Sheep & Wool
  • Resources: Costume and Textiles
  • Resources: Migration Era
  • Resources: Historic Glass Beads

Glass: Starting Out

3/21/2019

11 Comments

 
Having only been working with glass for a few years, I am by no means and expert, but given that several folks have asked me what I would recommend they get to start, I figured I have enough experience at least to share what is working for me, and I what I consider my personal necessities.

I started out with a ton of things, including many that I did not even know how to use.  It was amazing to have all the tools at my disposal from the start, thanks to a wonderful Christmas gift from my boyfriend.  He had basically bought me a whole studio kit from Devardi and I could just dive right in.  Not everyone can or wants to jump in that hard from the start, so I am going to let folks know what I use the most from my initial set up as well as the other things I have added on my journey.

One quick note about vendors before I go further.  I use three main suppliers for my glass and tools.  My favorite by far is Mountain Glass.  The folks there are super nice and very helpful when it comes to helping you decide what it is you need.  Their customer support is fantastic. They also ship very quickly, and while I have not yet done it myself, I understand that they also price match their competitors.  I recommend signing up for their weekly emails as they always have great sales going.  Plus sometimes they send you get cool weird things like posters, stickers or even a music CD in your packages.  ;-)  

​Another supplier I use is Howaco Glass.  This vendor has low prices on soft glass, and carries the major brands I love.  She also allows you to purchase a single rod of a color.  This is WONDERFUL for when you just want to test something out.  Shipping is not super quick, but I have never had an issue with my orders and I love the prices and convenience of buying just a single rod.

​Finally, I want to talk about Devardi.  Sometimes if you mention that name on some of the glass forums, you will get some pretty harsh reactions.  People either love or hate these products.  Personally, I think their kits for starting out are pretty fantastic for those who want to jump right in with all the tools at a good price.  Their marvers and mandrels are good quality and the price is fantastic.  Their glass is usually the big point of contention with folks.  It is "stiffer" than other "soft" glasses.  This means it can sometimes take a little longer to melt and work. Personally, I was GLAD to have that extra time when I was just starting out.  It saved me a lot of dripping drooping glass.  There are some professional artisans that prefer this glass for certain things because the stiffness allows for some pretty cool sculptural work as well.  I absolutely LOVE some of their colors (cobalt blue transparent, for example), and I have found others just are not to my taste (I find their clear clouds up and gets muddy with a hothead, and also is too stiff for encasing).  My recommendation regarding glass is to learn the basics and then sample everything out there (all brands) and find what suits your style and budget.  You cannot bead the price for bundles of Devardi glass to just get your feet wet and learn how to make beads.

Safety

I guess I should mention this sooner rather than later.  Be careful.  Read everything you can find on working glass and the safety precautions you should take.  Note that large propane tanks need to have long hoses so that they can be stashed outside while you work.  Make sure you are torching over a non-flammable surface (an aluminum sheet on your work station will suffice), make sure your torch is not too close to the wall.  Eye protection made for glassworkers is important (there are different grades protection depending on what type of glass you are working, look for didydium safety glasses).  And proper ventilation IS A MUST.  I work in a drafty garage, have open doors and windows near me, and only work for a short span of time at once.  As I am working longer stretches, I am now in the process of building a proper ventilation system (fans, ductwork, etc).  Note that the issues with ventilation are not really over the fumes from your fuel, but rather it is to remove the gasses from the melting glass (which can contain metals) from your air.  This is very important.  Please read up on ventilation for glass work.  A start on safety can be found here.

Torch

Picture
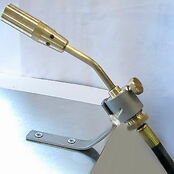
Devardi propane torch with bracket
My torch is a simple, single fuel torch from Devardi.  It is essentially their version of a Hothead torch that is used by glassworkers all over the world.  Note that this is different than the torches you buy at the hardware store, so I do NOT recommend getting one of those to start.  The Devardi version of the Hothead is very inexpensive and you can get a brand name Hothead from Mountain Glass or other vendors.  I use my torch with camping canisters of propane.  Some others prefer to use Map-Pro or other cutting fuels.  I will also soon be switching my set up to using large tanks of propane rather than the 1lb tanks now that I am making more beads in a sitting, I don't want to have to change a tank out as often.  Note that you will also need some sort of bracket with which to mount the torch to your work surface.  I use the one shown at the right.

Other torches need two fuels to work, usually propane or something similar, and oxygen.  These torches start at a couple hundred dollars and run into the thousands.  You also need a source of oxygen, either tanked oxygen (not legal everywhere), or an oxygen concentrator (which can be quite pricey, even for a refurbished one).  I took a class once and it used a duel fuel torch and I made a hot mess of the glass straight off because the extra heat from the torch, plus a softer glass than I was used to, it just melted and dripped onto the table.  I am more experienced now, am used to the softer glass, and itching to work faster, so at some point I might add this type of set up to my studio space (though I will not forsake my hothead).  

Cooling

After you create your beads you will need some method of slowing the cooling process of the beads.  If they cool too quickly they will experience thermal shock and crack.  There are a number of ways to do this.  I personally use a fiber blanket.  After a great deal of use, they can start to shred, but my first one has lasted me over two years and I just recently bought a replacement for it.  

Because I often work in a very cold garage, I added an extra measure of insulation by building a little box/frame for my fibre blanket out of foil insulation (shown to the left) and duct tape.  I think this helps hold the heat a little better.

Other options for cooling are to use a container full of vermiculite or annealing bubbles.  When your bead is done, and no longer glowing (you can check this by holding it briefly under your table where it is darker), you can plunge the mandrel into the pot.  The vermiculite or bubbles will allow it to cool off more slowly and prevent cracking.  Some people even go to goodwill and buy an old crock pot and put the vermiculite/bubbles in that and turn it on to help retain more heat.

Annealing

Note that cooling and annealing are two different things.  Beads MUST be annealed before using them, and they absolutely must (this is not even remotely optional) be properly annealed before selling them.  For annealing you really need a kiln of some sort.  There are many varieties on the market, and occasionally you might find one on craigslist.  They come in digital and analog versions, and a variety of sizes and have a range of temperatures depending on the type of work you will use them for.  I personally have used a Paragon Bluebird, and hope to eventually purchase a Paragon Caldera with a Bead Collar.  I am opting for a smaller kiln, that can fire at a higher temperature as I also plan to use it for Precious Metal Clay work and for melting metals for casting.  When it comes time to purchase a kiln, I highly recommend you talk to experts like the guys at Mountain Glass.

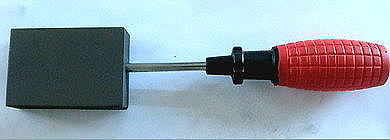
Devardi also sells a Mini Annealer.  Again, this item is a huge point of contention amongst long time glassworkers, as to whether it truly anneals or not.  I have been using one for two years, and my beads take some pretty hefty abuse and they are holding up, but I am waiting to get the Caldera before I start selling any of my work.  I am very happy with this little device and love that it has enabled me to really get use out of my creations thus far.  The annealer can also be used as a rod warmer (which is something I will discuss a bit further down).

Mandrels and Bead Release

These are two items you absolutely must have to make beads.  The mandrels are the metal wires on which you form the beads.  The bead release is a runny goop you apply to the mandrels that will prevent the beads from sticking to the steel.

For mandrels, I buy mine from both Devardi and Mountain Glass.  Devardi is a little cheaper but you need to take a bit of sand paper to the ends to smooth them, Mountain Glass has that already done.  There are many sizes of mandrels, and my preferences are for the 3/32" (2.4mm) and the 1/8" (3.2mm) sizes.  I have smaller and larger ones, but these are absolutely the ones I use the most.

Note that when you get new mandrels, you will need to wash them off and hold the ends over your torch flame to make sure that no oils are on them, as that can prevent the bead release from holding properly, causing it to flake off into your glass or possibly causing the bead to permanently adhere to the metal.

As for bead release, I started with the Devardi release that came with my kit and then bought two more bottles of it after that.  It works decently, but can be a bit of a pain to clean out of the beads later.  I tried Dip-n-Go Sludge Ultra on a whim when it was on sale at one point and I, honestly, can say it is life changing.  I love this stuff.  I have not ever had it flake, I have not had a stuck bead since using it, and it cleans out of the holes very easily. This is now my go-to bead release.

And yes, you do need to clean the beads later.  Some people use a dremel or other fancy tools, I just have the simple set listed on the right and a stiff pipe cleaner and it does the trick for me.

Other Tools

There are literally hundreds of tools you can use to shape your glass.  They come in a range of qualities, prices and styles.  I personally love the many graphite marvers that came with my initial set up and some of these are still in my most-used tools.

A handheld marver is a must for me.  Mine is an aluminum one from Devardi, but they also come in graphite.  You will hold a tool like this in one hand while you roll the bead across the surface to smooth or flatten it.

Other marvers have shaped surfaces that allow you to consistently make beads of a certain size or shape.  I have a dozen of these and my favorites can be seen below.  You do not need these to start out, as a simple marver paddle and gravity can make beads of many shapes and sizes, the shaped marvers just allow you to do it a bit quicker and more consistently.
Picture
Graphite Marver from Devardi
Picture
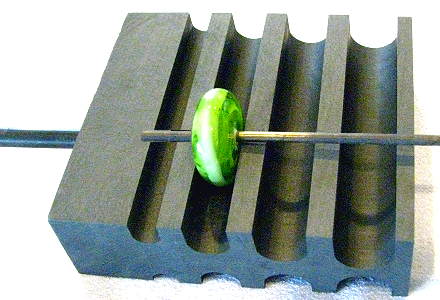
8 Slot Donut Marver from Devardi
Picture
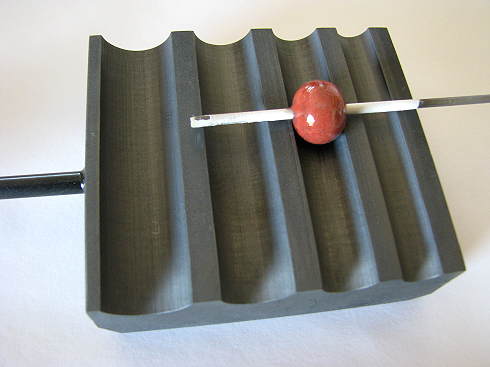
Round Bead Shaper from Devardi
Aside from marvers, you will need some sort of poking tool.  I prefer the tungsten probe from Mountain Glass.  I actually have a couple of sizes, but the one linked here is the one I most commonly reach for.  Some sort of rake is also needed to drag designs or dots on your glass.  Stainless steel dental picks work great as do the steel tools in wax carving sets (which can be obtained cheaply).  Along with a pick or rake, you will find dozens of uses for an inexpensive set of long steel tweezers.  You can use them to pick bubbles or flakes of bead release from a bead, manipulate the hot glass, apply murrini, and other things.  

One other tool that I absolutely cannot live without is an antique brass knife.  Stahl knives are wonderful for working glass.  Aside from my marving paddle this is the item I reach for the most.  You can find them on ebay and sometimes on Lampwork destashing forums.  I only paid $15 for mine and it is very much worth it.  Many of them are quite decorative with horn or ceramic handles.  I cannot recommend owning one enough.  Hot glass does not like to stick to brass, so you can use this tool to press designs into your work, mash small areas flat, spread encasing glass... the list goes on.
Picture
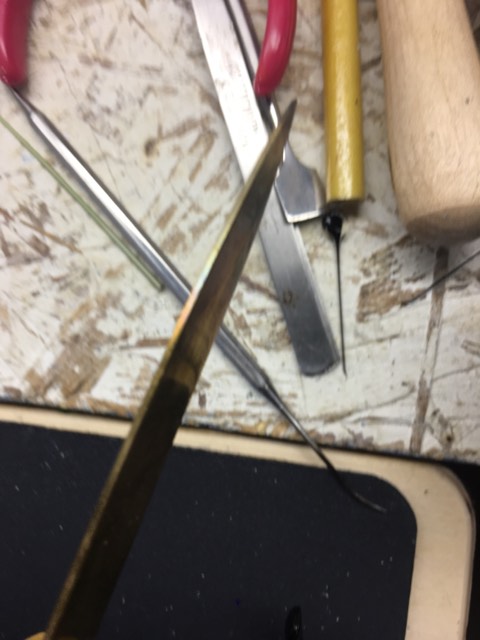
The edge of my brass knife
Picture
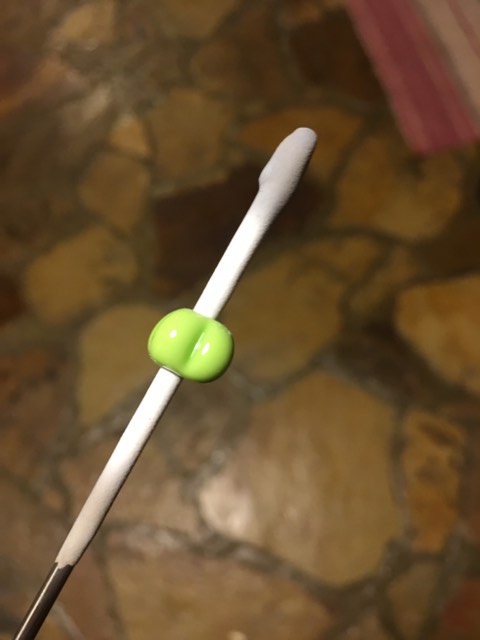
A melon bead shaped with the flat edge of the knife
The above items the start of my list of basics.  My next post will discuss the glass itself!!!

​A Wandering Elf participates in the Amazon Associates program and a small commission is earned on qualifying purchases.
11 Comments

Patterned Weaves - Preliminary Data

3/18/2019

0 Comments

 
(Please note that this article is not yet complete, but I thought it best to put some preliminary information out there as I keep finding myself referencing this type of material in conversations with others.  If you have other items that you think belong in this collection, please let me know!)

Normally I spend months (or years) collecting data for an article, and then I triple check it, write it up, sit on it for a few more months, do the research again, triple check it and then post it to this blog.  That was pretty much the process for my articles on edgings and plaids.  I have one pet-project that I have been working on far longer than any of these, but I intended to weave samples of the items before posting so I held off sharing my research.  With the addition of 3 Savannah kittens under 2 years old to my house, weaving has been put on hold so I am going to go ahead and share the preliminary collection of data from this research now (in a truly unfinished form).

There is this perpetual idea among reenactors that if clothing is not covered from hem to hem in embroidery, that it is some how bland, dull or will be "cookie cutter Viking" (meaning that everyone will look alike).  The fact is that we have very little in the way of Viking Age embroidery (and some of it, such as the metal thread Valsgard items, are considered likely to be imported goods).  My own opinion is that the items like wallhangings are far more durable, and will last generations, while an embroidered garment would not last nearly as long due to wear (and would then be limited to only the highest levels of society). Further, there were ways, in period, of decorating the cloth itself that do not take too much additional time on behalf of the weaver.  We see ribbed textiles as well as those with warp or weft floats.  These techniques can provide texture and interest in a garment in less time than embroidery or other more complex methods of adornment.
​
Picture
Image of weft float patterning from Hedeby 5/1964. This technique does not use an additional weft (or warp in the case of warp patterning) to create a pattern but instead uses the existing weft threads lifted over a number of warp threads to form a pattern.
Picture
Diagram of textured textile from Hedeby (fragments 31 A-D), that shows the addition of thicker threads (likely in the weft) to create texture and visual interest in the tabby textile.

Some textiles are woven in more complex brocade or tapestry techniques to create patterns.  These can be as simple as rows of soumak weaving to form bands or diagonal lines, or detailed brocade styles such as krabbasnår or tapestry techniques to form complex patterning.  Below I will share some of the items I have found so far into my research on this type of textile from the Viking Age. Note that here I am only collecting data for wider textiles, and not bands woven in this technique.

Oseberg

The grave at Oseberg (834AD) is full of wonderful things, from exceedingly fine diamond twill to elaborate (and likely imported) embroideries, to incredible silks (and the woodwork alone is worth taking the time to look up this find).  Among the many items from this grave were some items created using incredible brocading techniques.  

Tapestry
There are many fragments of one (or possibly more) woven tapestries that depict a procession of some sort.  This work had a wool warp and wool soumak and supplimentary weft and likely a linen weft which is now gone, it also had tablet woven borders.  This work was narrow and might well have been woven on the Oseberg frame loom.  (Images from Unimus.no)
Picture
Picture
Another bit of interesting tapestry from this grave is a more floral piece that is thought to have been part of a pillowcover, due to traces of down being attached to one surface.
Picture
Oseberg also yields remnants of Åklæ (coverlets or possibly wall hangings, described as 'fabrics with brocading of coarse woolen thread'). One of these items has geometric patterns woven in the krabbasnår technique.  This type of weaving still exists today in Scandinavia where it is currently woven on a horizontal loom with underside of the weaving being the "correct" side of the cloth.  The weaver uses a mirror to better see the bottom of the fabric to check for errors.  In my sampling of this type of work on a warp-weighted loom, I discovered that I very easily could weave it where I could see the correct side as I worked.  I used naalbinding needles with my supplementary weft hanging behind the loom (tapestry bobbins work as well).  It is easy to manipulate the warp threads to reach through them and pull the needle or bobbin up through the correct space because the warp is more mobile than warp on a two beam loom (my manipulation of it does not cause the threads to sag the way it would on a modern horizontal loom).
Picture
Picture
Picture
Another item that is listed as possibly an Åklæ is the geometric design pictured below in an aquarelle from the find and a patter from Sophie Krafft's book describing the designs from the Oseberg burial.

While it is hard to know the full usage of these items, they are considered to be home goods (coverlets, wall-hangings, possibly cushion covers) be those who have examined them.

Picture
Picture

Birka

Krabbasnår and other decorative weavings such as Opphämta also show up at Birka.  Five examples have a dense, ribbed background, as did the Oseberg Åklæ, with a coarse woven pattern floating over it.  In addition to those items, there are also textiles from Birka that are described as being "tapestry-like" fabrics.  In these textiles, the weft completely obscures the warp yarn. Soumak is also seen in Birka fabrics.

Below is a chart of the tapestry and brocade textiles listed in Birka III (Geijer) and 
Textilien und Tracht in Haithabu and Schleswig (Hägg).  I hope to soon make a separate post detailing what information I can find on these items.
Picture
Picture
Birka 660
Picture
Birka 739
Picture
Birka 968
Several items at Birka fall into the category of soumak weaves, including Birka 597.
Picture
Birka 597
Picture
The "border" pattern illustrated here in example A is soumak (source, Birka III)
Another example from Birka that I believe to be soumak is from 943.  This textile is a wool cloth with a hardspun, blue-green linen yarn that passes through the base fabric in lengths of equal size on both sides, forming diagonal lines.  
Picture
Birka 943 showing that the stitches of the linen yarn look the same on both sides of the cloth.

Hvilehøj, Denmark

Picture
The textiles from this grave are described as being of exceptional quality.  Included among these is a very fine white wool tabby with fine wefts forming crosses and lozenges.  (Hald, Bogs and Burials)
Picture

Hedeby

Hedeby yields items from four graves, 497, 5/1964, 188/1960 and 159/1960 that have textiles that fall into the categories previously mentioned.
Picture
Hedeby diagrams 188/1960
Picture
Picture
Hedeby 5/1964
Picture
Hedeby 5/1964

Scar Boat Burial, Scotland

In the female grave at Scar there was both a self-patterned tabby and a brocaded textile that was possibly part of a pillow or cover.
​

Additional Norwegian Finds

While researching the Oseberg items, I found references to three additional Norwegian finds of brocade or tapestry techniques.  These are from Haugen in Rolvsøy, Bo in Torvastad and Jåtten in Helland.  Of these I have already sourced images from Bo in Torvastad (source, Unimus.no).

​
Picture
Picture

Överhogdal Tapestry:  This item has been dated to the very end of the Viking Age. There is a great deal of information on this amazing work here: https://www.jamtli.com/en/exhibitions/overhogdalsbonaderna/

Peripheral Finds

Valsgarde:  In Northern European Textiles, there is mention of a pre-Viking Age textile with now vanished pattern threads (and the same grave also has a fabric with a warp or weft float-pattern).  Unfortunately, at this time I know little else about this cloth, including the fibre content.

Saxon: Cloth and Clothing in Early Anglo-Saxon England (Penelope Walton Rogers) has a section dedicated tapestry and soumak weaves.  Soumak shows up at Sutton Hoo and Taplow, with both basic forms and in combination with blocks of tapestry weave, the latter of which are compared to Valsgarde 8, Birka and Oseberg.

I also occasionally come across items with little or no provenance for which I would love have the details.  An example is this image (below), which is described as Slavic embroidery, but it looks very much to me like it could be woven work.  I would absolutely love more information either way.
Picture
0 Comments

Viking Bead Research:  Birka

3/9/2019

1 Comment

 
A couple of weeks ago I sifted through Danish Inhumation Graves of the Viking Age to get an idea of the average number of beads in grave assemblages in that area and made a post discussing my findings.  This past week I have combed through the Birka material (both volumes of Birka I as well as the Birka Grave Catalog online).

I used the same criteria that I used for the second half of my previous review of the Danish material, that being oval brooches, as that is my real interest in this.  I covered 147 graves with oval brooches, 5 of those had some issue with provenance, exceptional fire damage or other things resulting in inconclusive data, causing me to eliminate them from my final count.  3 graves had both cremation and inhumation burials, so they were included in the total, but not in the breakdown of graves by type.
  • 142 total graves with oval brooches had 3252 beads, with an average of 22.74 beads per grave.  The number of beads per grave ranged from 0-306.
  • 22 cremation graves with evidence of oval brooches had 248 beads, with 14 average beads per grave, and a range of 0-72 beads.
  • 120 inhumation graves with oval brooches had a total of 3004 beads, with an average of 25 per grave and a range of 0-306.  26 of the graves had no beads at all.
  • EDIT 3/19/19: Per my comments below, I went back and looked at the graves and found that when I take into account location of beads in the 120 inhumation graves, and remove those that were obviously found elsewhere in the grave (such as at the feet), the average number of beads drops to 17 and the range is 0-194. Note that this still includes items that might be a separate necklace in addition to brooch swag if it was still found in the upper body area.  ​
Picture
Picture
Both of the sets of beads above were from Birka 508.  What is critical in this grave is the context.  I had a total of 306 beads but ONLY 77 of them were worn near the brooches, the remainder were found near the feet.  Photo credit to Historiska museet.  Eventually, I will recalculate the totals with that type of context in mind.

Birka 526 is another grave that has a very large number of beads, but not all of them were part of the assemblage with the oval brooches.  In that grave 194 of the beads were located near the brooches.
Picture
Birka 464 photo credit to Historiska museet
Picture
Birka 835, photo from the Historiska museet.
Picture
Birka 847, photo credit to Historiska museet
Something that I found interesting that I plan to address soon, is the color difference between image in Birka I, drawings from the period, and actual photos.  The first is very dull, while the other two are radiant with color.  Below are examples from Birka 550.
Picture
Birka III book
Picture
Historiska museet image from Birka Graves site
Picture
Glorious detailed shot of beads from Birka 550
1 Comment

Oval Brooch Article

3/9/2019

0 Comments


Woke up this morning all excited to eat the German Coffee Bread that i made last night and discovered that while I eat I also get to consume Hilde Thunem's new article on Oval Brooches!

http://urd.priv.no/viking/brooches.html

I am sharing the article with y'all because I cannot share the bread ;-)

Picture
0 Comments

Viking Bead Research: String!

3/7/2019

3 Comments

 
PictureOne of the beads with wire in the center from Lovö from Moa Råhlander's work.
 
As soon as I started researching beads, people started asking me “What did they use to string them in period?”  I didn’t have an answer as I had not yet come across any evidence (though, admittedly, during the years of focusing on textiles, I would deeply read those portions and take notes, and skim through other sections of the books, making it easy to miss things).
 
Realistically, I think the answer should be “Whatever they had that worked,” but of course I always want further evidence to something less on the speculative side.
 
In the past I have tried linen string, waxed linen string, silk cord, and metal wire, as well as modern solutions (which will be mentioned more in depth below).  I can honestly say that none of those more period options impressed me.  All of them eventually gave out and had me scurrying to collect beads.
 
In her paper “How Beads come Together”, Moa Råhlander looked at burial assemblages from Townsend Farm Road in Kent (6th and 7th century), as well as Lovö in Sweden (8th and 9th century).  Several beads from the latter site have traces of corroded iron wire inside of them.  She states that it does not take much of a leap to come to the conclusion that it was the material used to string the beads.
 
Not long after having read this, David Huggins posted an image from a book about a Saxon Cemetery in Essex, England, that has well preserved bead threads that describes some as being plied pairs of threads that are plied together tightly as well as plaited techniques such as whipcord.  In one of these finds the cord was wool but the rest were linen.  As I was looking at the bead information last night in the book Buckland Anglo-Saxon Cemetery: Dover and I saw that it also references traces of linen cord that had been used to secure beads (this book also has lovely images of the beads that are printed TO SCALE!).

Additionally, Birka cremation grave 29 has traces of bronze wire in three of the beads and Grave 385 has it listed that melted beads were mounted on bronze wire.

ETA (3/26/19): I found images of a find from Kalmergården in Denmark that show beads with a twisted linen cord going through it (photos from the National Museum of Denmark).  I am unsure of the dating beyond Iron Age, but if someone has the answer to the time for this, I would love to know it!

So now I think I have a decent answer, and it also leads to further thoughts on the matter.  Wire can be fragile, especially once it gets bent or kinked.  Linen cord can easily be worn through with use, though multiple plies, tight twisting, and plaiting can help maintain strength for longer.  Beads can have sharp edges or even sharp bits inside the bead (especially if there was a bubble trapped against the mandrel) which will further wear at a cord.  These facts add to my ideas that things like beads, especially with their high value in period, were really special occasion items.  You were not working the garden in them, tending animals, or anything like that.  They were reserved for better affairs.  Yes, I can do all of my normal things at events while wearing my brooches an bling, including set up or tear down camp, but that does not mean that I think people did it that way in period.
 
Modernly, I usually use tiger tail type beading wire.  I form an end into a loop and fix it with a crimp beads, string my beads and the add crimps and a loop to the other end.  This has proven the most sturdy method so far (even though it is very modern).  When I make my next strand of Viking beads, I am going to use tightly braided linen cord (possibly even some of my hand spun) and see how well that works.  I think that if I avoid excessive labor while wearing the beads, it might be a good option.  I am also planning to test out the use of braided sinew (artificial at first) as a possible option (especially given the diameter of the hole in many of the Viking Age beads).

Picture
Picture
3 Comments

Viking Bead Research: Pagan Lady of Peel

3/6/2019

5 Comments

 
Location:  Peel Castle, St. Patrick Island, Isle of Man
Date:  10th Century
Type of Find: Burial
Date of Excavation: 1984
Context: All beads were found in neck area with the exception of the two largest amber ones, which were found at the waist
Beads: 73 beads, 8 of which were broken
 
Several weeks ago in another post, I noted I would soon talk at more length about the Pagan Lady of Peel and her fabulous necklace.  Since then it has been announced that the necklace will go on display in York, and numerous people have sent me the news articles for that, so I guess now is really the time to do this one.
​
PictureImage credit to Leszek Gardeła and Mirosław Kuźma, from the article “Viking Death Rituals on the Isles of Man”.
Excavations began in the Peel castle in 1982, with the Viking graves being discovered in 1984.  There are additional graves from both before the Viking Age and during the middle ages also found in this area.  The excavations produce a total of 7 pagan graves from the Viking Age, with 5 being adult and 2 for children.  Only one of them was female, and it is considered to be one of the wealthiest female graves found in the British Isles.  The lintel grave was professionally excavated and well documented so I consider it a reliable source (especially given the amount of attention this one has also received since then).

In addition to the necklace of 71 beads (glass, amber and jet), with 2 amber bead-amulets, the grave also contained three knives (one of which only a hilt remains and one is noted to likely have had some sort of specialized purpose), iron shears, an antler comb, remains of a leather pouch with metal fittings and two bronze needles, an ammonite fossil (thought by Saxons to be a fertility charm), a goose wing, herbs, a possible mortar and pestle, and feather filled pillow.  Additionally there were fragments of three textiles, one of which is believed to have been a sprang hairnet.  There was also an item initially believed to be an iron spit, but later researchers have compared it to similar items in female graves that are thought to be seiðr-staffs, indicating that the women interred might have been a seeress or sorceress of some sort.  (Price; Gardeła)
 ​

Picture
Pagan Lady of Peel necklace, photo credit to the Manx National Heritage
PictureMy collage to demonstrate what the possible "otter disturbance" at the Scar burial looked like.
​The early reports on the grave believed that the lack of oval brooches indicated that the woman was Celtic or perhaps second generation of Norse and Celtic (with Norse immigrants marrying local women).  Later research and isotope analysis has determined that the middle-aged Pagan Lady of Peel migrated to the island herself, possibly originating from a Norse settlement in the British Isles or even Scandinavia (Symonds, et al.). 
 
Did she ever wear oval brooches?  We do know that by this time they were going out of fashion in Denmark, and if she perhaps came from a settlement in the British Isles, there already could have been adoption of local dress.  It is also possible that she wore them in life but was not sent into the next world with the jewelry for some reason.  Comparisons have also been drawn to her grave and many other status graves of the Viking age.
 
This particular grave is referenced in many other works, include the Scar boat burial in Orkney Scotland.  This grave dates to the late 9th or early 10th century, and contained an equal-arm brooch, a wooden handled sickle, textiles (included a brocaded wool cloth), a whalebone plaque, a comb, a weaving batten, shears, a box with metal fittings, whorls, and a sickle.  The wealth of this grave, as well as lack of oval brooches is the reason that comparisons are made between the two, however, the book covering the work at Scar repeatedly notes that there was an “otter disturbance” (that’s a direct quote) at the site that could have resulted in displacement or loss of the brooches.  I know that if I were an otter, I think I would very much love to have shiny brooches for myself.  Another correlation that could possibly be made is the völva grave from Fyrkat which also has no oval brooches.

Picture
Diagram of the Pagan Lady grave, showing the dispersal of the beads in the neck area of the interred body.
Picture
Picture
​The Beads
 
71 one beads comprised the necklace, with 8 of them being broken.  Two additional amber beads (the largest in the find) were found near the waist.  The materials for the beads include glass, amber and jet and have origins in Scandinavia, Anglo-Saxon and the Mediterranean or Middle East. 

One bead is faiance, and is believe to be imported from the Mediterranean or the Middle East and may well have been an antique to the Pagan Lady.  There are amber beads, likely from the Baltic, in the strand, a long blue bead is considered to be an Irish ‘String’ bead.  Two of the glass beads incorporate millefiori, one of this is thought to be an Eastern import.
 
In her thesis, “Perler fra vikingtiden”, Hickey compares beads from Peel (and other sites) to those cataloged in the Guido’s The Glass Beads of Anglo-Saxon England.  Based on that possible origins for various beads include Rhineland, Rhenish, Frisian/Frankish, and more locally, Netherlands, and Scandinavia as well as many of local manufacture.
 
The beads were possibly collected over a lifetime and may even include some brought from her homeland in addition to prized imports.  I wish that I had a better analysis of each bead in this grave, and have one more book coming to me via ILL that might have more detail.  If indeed it does, I plan to post the additional information here.

If you want to see a very large image of the necklace, please visit the link for the Isle of Man museum here:  https://tinyurl.com/y4f2pzd4

Another site that is worth looking at is that of Glonney Designs.  The artist briefly discusses the necklace and also has two images (that I wish were much larger) of the beads laying flat, rather than strung.  It better allows you to get a sense of size and same for some of the beads. I am trying to source these items in a higher resolution version, ​glonneydesigns.wordpress.com/category/studio/the-pagan-ladys-necklace-project/

Resources:
 
Gardeła, Leszek.  “Viking Death Rituals on the Isles of Man”, Viking Myths and Rituals on the Isle of Man, University of Nottingham, 2014.
 
Goodrich, Russell.  “Scandinavians and Settlement in the Eastern Irish Sea Region During the Viking Age”, PhD Dissertation, University of Missouri-Columbia, 2010.
 
Guido, Margaret.  The Glass Beads of Anglo-Saxon England: c. AD 400-700, Boydell Press, 1999.
 
Hickey, Megan.  “Perler fra vikingtiden: A study of the social and economic patters in the appearance of beads from Viking-Age sites in Britain”, Master of Arts Research, University of York, 2014.
 
Holgate, Barbara.  “The Pagan Lady of Peel”, St. Patrick’s Isle Archaeological Trust, 1987.
 
Mainman, A.J. and N.S.H. Rogers.  “Craft, Industry and Everyday Life: Finds from Anglo-Scandinavian York”, The Archaeology of York, Volume 17: The Small Finds, 2000.
 
Miller, Ben. “Child grave goods from the Isle of Man castle and Viking beach market discoveries head to Cornwall”, Culture24, 1/27/2015.
 
Morris, Carole. “An Irish ‘String’ Bead in Viking York”, Bead Society of Great Britain Newsletter, 58.
 
Owen, Olwyn and Magnar, Dalland.  “Scar: A Viking Boat Burial on Sanday, Orkney”, Tuckwell Press, 1999.
 
Price, Neil.  The Viking Way: religion and war in late Iron Age Scandinavia. Aun 31. Uppsala, 2002.
 
Richards, Julian D. “Pagans and Christians at the frontier: Viking burial in the Danelaw”, The Cross Goes North: Processes of Conversion in Northern Europe, AD 300-1300, 2003.
 
Ruffoni, Kirsten.  “Viking Age Queens: The Example of Oseberg”, Master’s Thesis, University of Oslo, 2011.
 
Symonds, Leigh, et. al. “Medieval Migrations: Isotope Analysis of Early Medieval Skeletons of the Isle of Man”, Medieval Archaeology, 58, 2014.
 
Vannin, Ellan.  “’Pagan sorceress’ Viking necklace on display in York,” BBC, 2/20/2019.
 
5 Comments

Soapbox: You get what you pay for

3/1/2019

1 Comment

 
 I am going to be very blunt in the fact that I utterly detest the site Wish.com.  Yes, there is a certain allure of being able to buy tons to craft supplies, socks, or even reenactment jewelry for mere dollars!  But the reality is that these items are sweatshop labor.  They sometimes even buy an item from a legitimate artisan, and recast it more cheaply, and then sell it.  They go further to even swipe the very photos the original artisan professionally took to market their second rate crap.  Sometimes they are even stupid enough to leave the original logos on the marketing images.

Yes, this vile company allows their vendors to not only STEAL original designs from your SCA artisans, but they ALLOW them to steal the promo photos as well.

This is unethical.  There is no way around it.  I would even go further and say it is pure evil.  This should never, ever be supported.

And even worse is the corporation Wish itself.  They simply do not care.  These same goods can show up on Amazon, but there is at least some recourse there to report that type of vendor.  This is far beyond unethical.

And you know what else?  Merchants there can have multiple storefronts with the same crap.  If they do get one banned, it doesnt matter because they just keep going with the others. 

Why would they get banned?  Well, some of these vendors don't actually sell ANYTHING.  They take your money, move on, and leave you with nothing.  And you know what else?  There is no quality control with any of this knock-off crap.  How much lead is in that bit of cheap Viking bling you bought?  Sure, put that on your kid....  Go online and do searches for the horror stories out there about items people have received.  Do you know some have even gotten infections from certain products?

​And why am I posting this here?  Because one of the things they have been selling like crazy are viking brooches.  Some of them are even quite beautiful.  Some are based on extant pieces.  Most of them are very low quality junk (even though they are indeed pretty).  

Understand that if you order these items that the oval brooches usually have the pin aligned in wrong direction.  They cannot hold the straps of your dress that way.  That is actually good, because the pin is thin, similar to a brooch your grandmother would wear to church, not the sturdy hardware requisite of brooch meant to hold a garment, beads and bling.  The same friend who has this oval brooch depicted below also had a trefoil, the pin broke off (and it was under no strain at the time as it was not holding a dress up).  

Unfortunately, some of these items are also now bought in bulk and being resold by vendors at SCA events.  I think they might make lovely accessories (assuming the pins don't pop off) with modern garments, but they likely will not hold up to use in the SCA or reenactment.  They might even be a decent decoration for a newcomer who wants to feel pretty.  But be warned that you get what you pay for (or not, because you might just be getting ripped off).  There are so many amazing artisans out there who do the work and research and put together incredible items that we can use.  I highly recommend tracking some of them down!  Far better to support our own vendors, and just own less bling, than to continue to support these unethical vendors and the utterly horrid company that houses their online storefronts.

If you already own these brooches, my recommendation is to sew the straps of your aprondress down to the garment on both ends and just pin the brooch on the strap as a decoration.  It will likely flop around oddly but you wont risk it breaking and your dress drooping!
Picture
"it's like a cheaply made nightmare" - quote from the friend who bought these pins, lol
Picture
And example of Wish's assortment of cheap Viking items.
1 Comment

    About Me

    I am mother to a billion cats and am on journey to recreate the past via costume, textiles, culture and food.

    A Wandering Elf participates in the Amazon Associates program and a small commission is earned on qualifying purchases. 
    ​

    Archives

    March 2023
    February 2023
    November 2022
    October 2022
    September 2022
    June 2022
    May 2022
    March 2022
    March 2021
    February 2021
    September 2020
    August 2020
    July 2020
    June 2020
    May 2020
    March 2020
    January 2020
    December 2019
    November 2019
    September 2019
    July 2019
    June 2019
    May 2019
    April 2019
    March 2019
    February 2019
    January 2019
    November 2018
    October 2018
    September 2018
    August 2018
    July 2018
    June 2018
    May 2018
    April 2018
    March 2018
    February 2018
    January 2018
    December 2017
    November 2017
    September 2017
    August 2017
    July 2017
    June 2017
    May 2017
    April 2017
    March 2017
    February 2017
    January 2017
    December 2016
    November 2016
    October 2016
    September 2016
    August 2016
    July 2016
    June 2016
    May 2016
    April 2016
    March 2016
    February 2016
    January 2016
    December 2015
    November 2015
    October 2015
    September 2015
    August 2015
    July 2015
    June 2015
    May 2015
    April 2015
    March 2015
    February 2015
    January 2015
    December 2014
    November 2014
    October 2014
    September 2014
    August 2014
    July 2014
    June 2014
    May 2014
    April 2014
    March 2014
    February 2014
    January 2014
    December 2013
    November 2013
    October 2013
    September 2013
    August 2013
    July 2013
    June 2013
    May 2013
    April 2013
    March 2013
    February 2013
    January 2013
    December 2012
    November 2012
    October 2012
    September 2012

    Categories

    All
    12th Night
    14th Century
    AEthelmearc
    Aprondress
    Awards
    Bog Dress
    Bronze Age
    Dance
    Dance Name
    Distaff
    Dyeing
    Embroidery
    Fiber Arts
    Flax Growing
    Food
    Glass
    Haberci
    Headcoverings
    Inspirations
    In The News
    Library
    List Of Links
    Machine Embroidery
    Metal Clay
    Mid Month Inspiration
    Migration Era/Iron Age
    My Documents
    Ottoman
    Ottoman Fabrics
    Pennsic
    Publications
    Research
    Rigid Heddle
    Sca
    SCA Camping
    SCA Forestry
    Sca Name
    Sca Newcomer
    Sewing
    Sheep
    Spinning
    Textile Charts
    Tips
    Totally Not SCA
    Viking
    Viking Bead Research
    Viking Costume: Beyond The Myth
    Viking Swatch Book
    Viking Textiles Looking Deeper
    Weaving
    Wool


      Email Updates

    Subscribe to Newsletter

    Blogroll of SCA & Costume Bloggers

    Below is a collection of some of my favorite places online to look for SCA and historic costuming information.

    More Amie Sparrow - 16th Century German Costuming


    Gianetta Veronese - SCA and Costuming Blog

    Grazia Morgano - 16th Century A&S

    Mistress Sahra -Dress From Medieval Turku 

    Hibernaatiopesäke

    Loose Threads: Cathy's Costume Blog

    Mistress Mathilde Bourrette - By My Measure: 14th and 15th Century Costuming

    More than Cod: Exploring Medieval Norway

    RSS Feed


Proudly powered by Weebly