A Wandering Elf
  • A Wandering Elf
  • Blog: My Journey
  • Iron Age Celtic Studies
  • A Wandering Elf in the Woods
  • Classes
  • Resources: Sheep & Wool
  • Resources: Costume and Textiles
  • Resources: Migration Era
  • Resources: Historic Glass Beads

Some mythbusting and tips for starting a Viking Age kit

11/7/2022

4 Comments

 
Are you aiming to dive into Viking clothing or looking to upgrade a more fantasy Viking Age wardrobe into something more suitable to historic reenactment?  There are many traps most folks fall into when they start out (myself included).  Below is a brief list of things you can do from the outset, so that you can better fit the scene, if that is your desire.  In the past, I have taught a short class in the SCA about how to start your first Viking kit in a fashion that can be built upon later, rather than having to be totally reworked, as you progress towards higher authenticity.  Many of these clothing items are mentioned in the class.  This article is specifically for the Viking Age and broadly covers Denmark, Norway, Sweden (but not Gotland, which has different clothing traditions), Iceland, and the British Isles.  This[MKB1]  does not apply to Finnish, Baltic or Rus clothing, and may not apply to every time and place even in the areas covered.  Further research should be done to better align your clothing and equipment choices to fit the culture and class of your persona.

Note, if you belong to a reenactment group that has specific standards or a guide book, one should always consult that book or the authenticity officers as to what is allowed.  If you do not care about historical accuracy and just want what you personally feel is a “Viking look”, that is fine, especially for the SCA or Viking or Ren Faires.  This article is not geared to telling someone what they are doing is “wrong”, but rather to help align the evidence and help those who might want to take the next steps towards a more realistic historic interpretation.
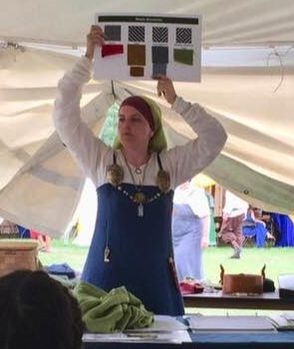
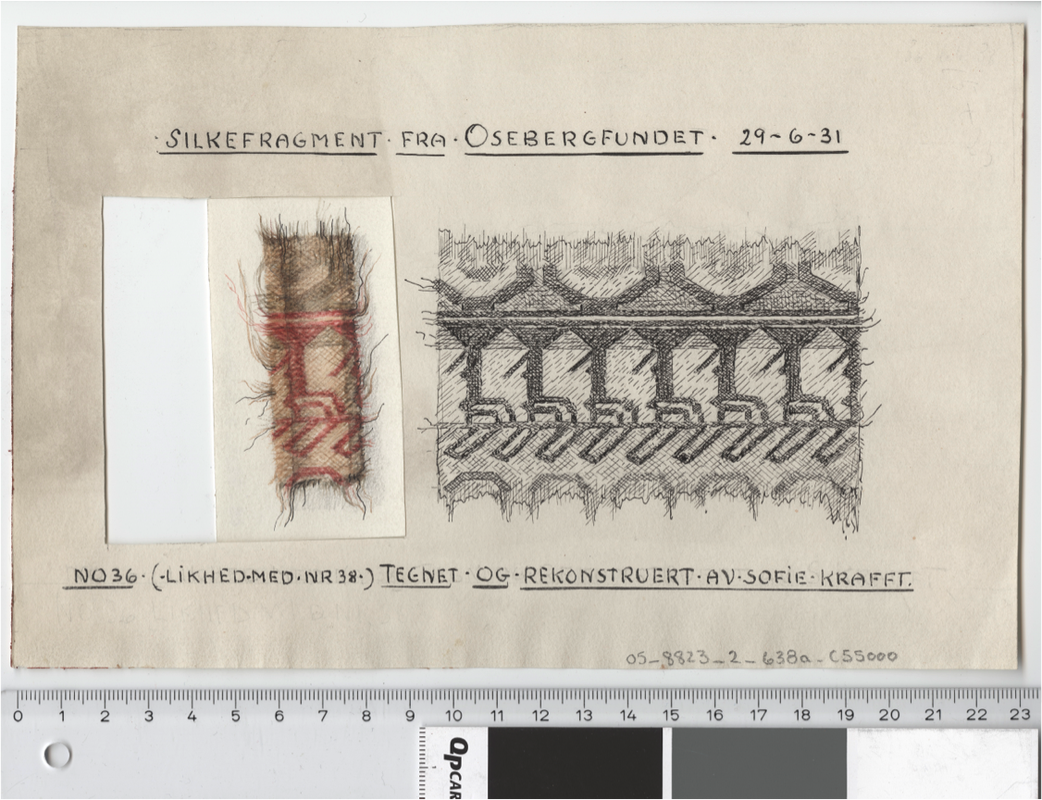
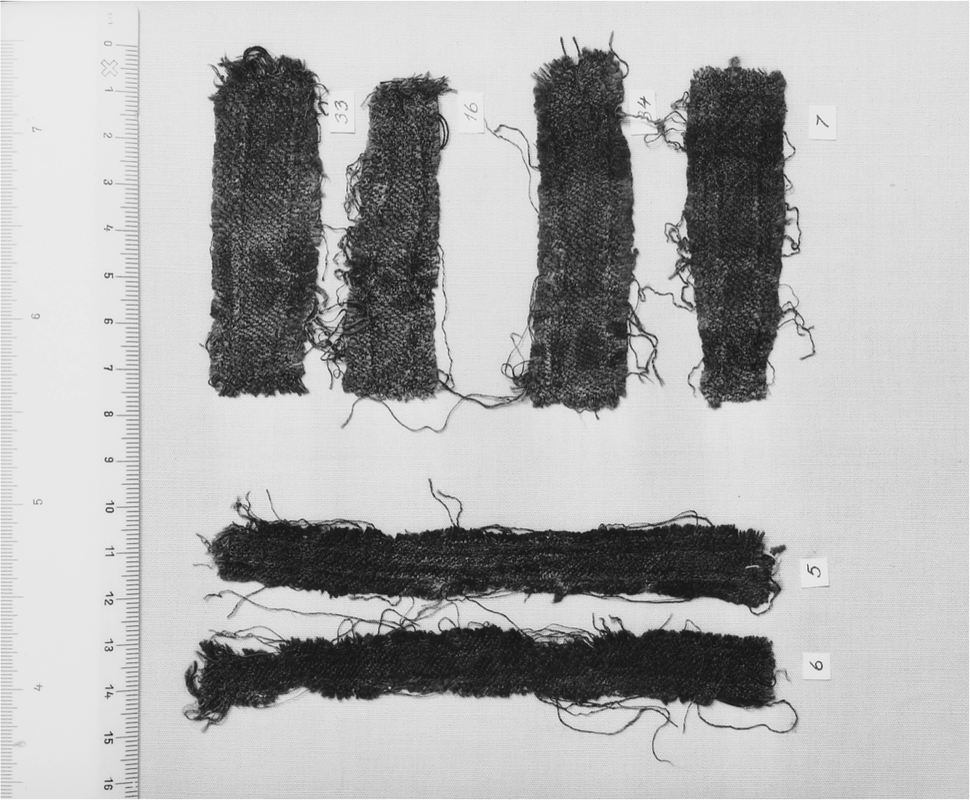
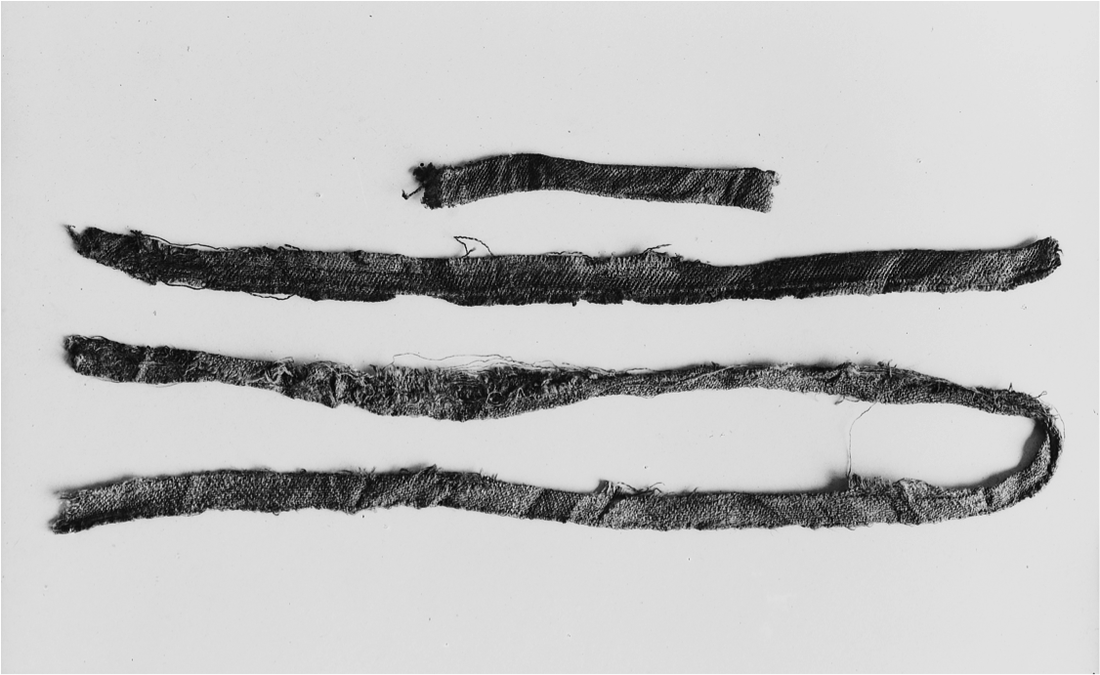
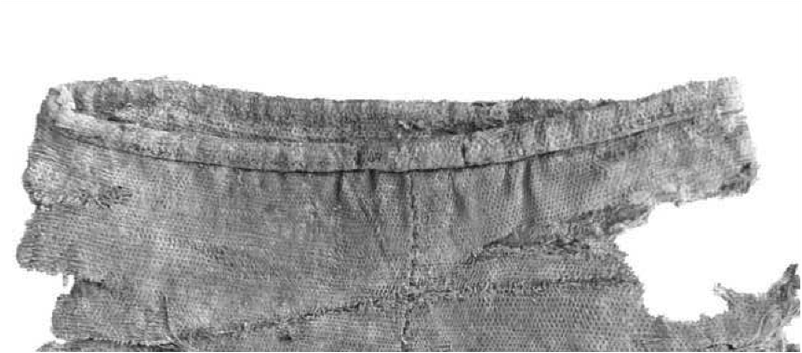
  1.  1)Textiles – the most common textiles in the Viking Age are wool and linen.  The most common weaves are tabby (plain weave, also called linen weave or canvas weave) or twill (this is a diagonal weave structure such as you find in your blue jeans).  My charts HERE show how common different weaves were in different areas.  Researcher David Stříbrný also has an article HERE about how uncommon herringbone twill is in period as well.  I have another article HERE which will help you distinguish a period diamond twill from types that we do not often see in the Viking Age.  Plain tabby and twill in solid colors are the best choices for most situations.
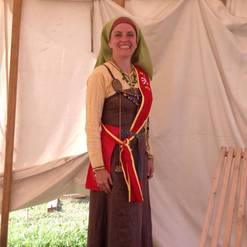
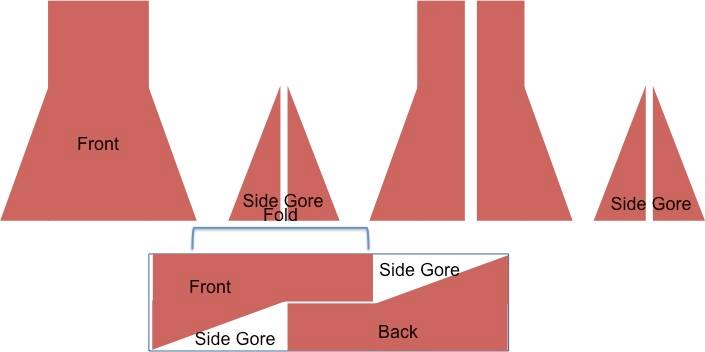
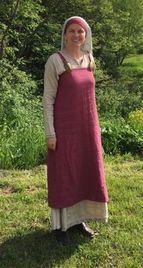
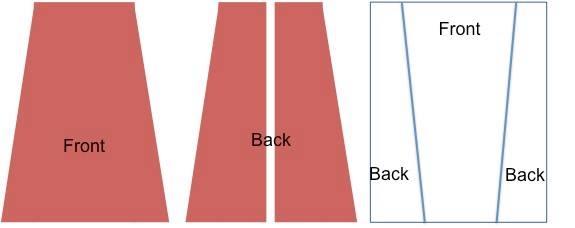
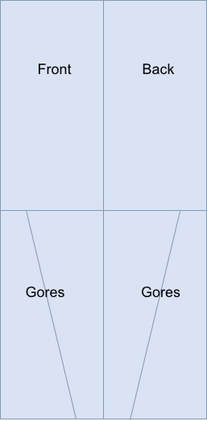
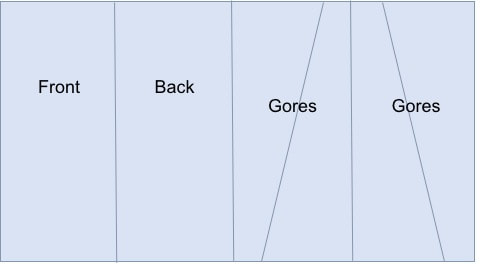
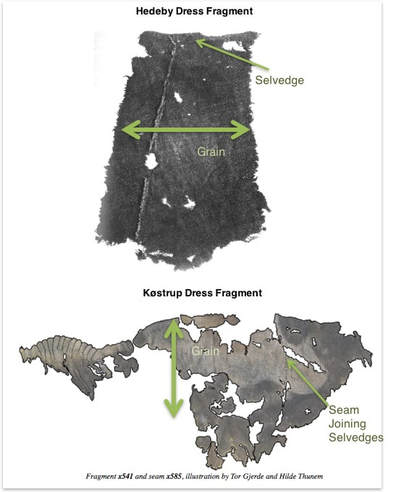
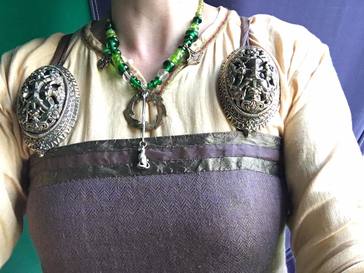
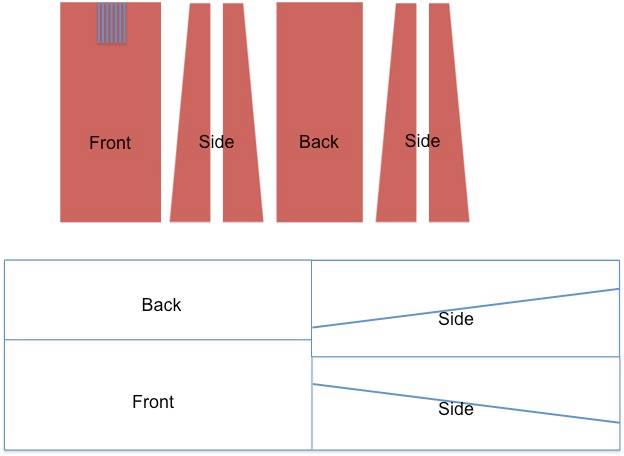
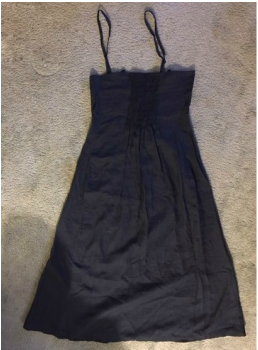
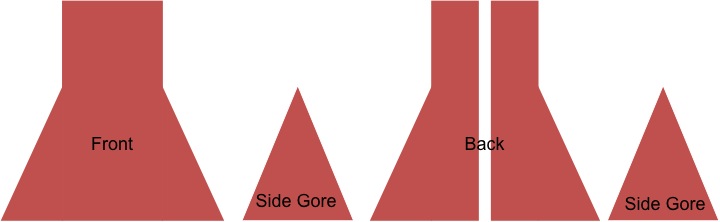
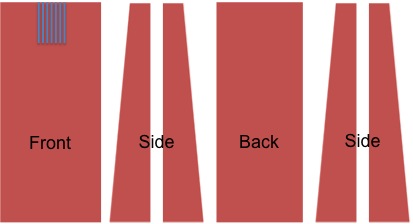
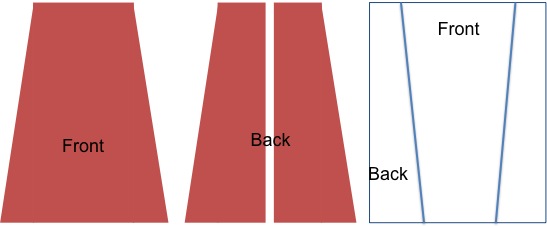
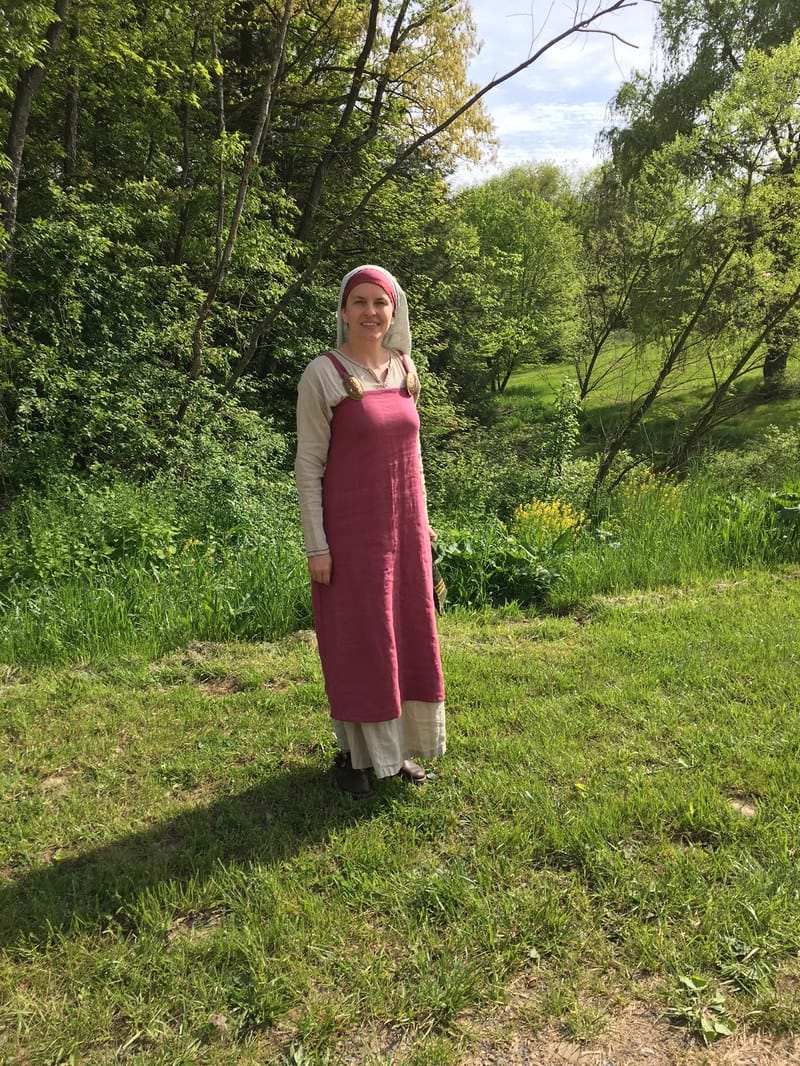
  2. Not every Norse woman in the Viking Age wore an apron-dress (or those that did might not have worn it in all situations).  I have an article on apron-dresses HERE and Hilde Thunem talks dress/tunic/gown construction HERE. This is fantastic, because brooches are often the most expensive part of a woman’s kit, and starting with a simple dress means you can sort out what details of your persona BEFORE buying that pricey bling.
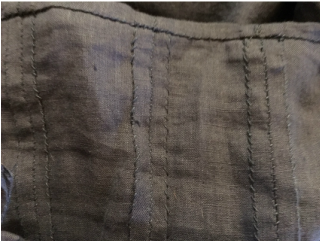
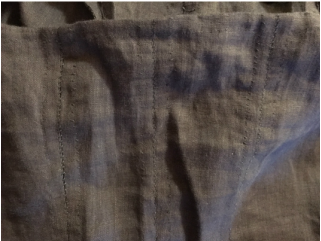
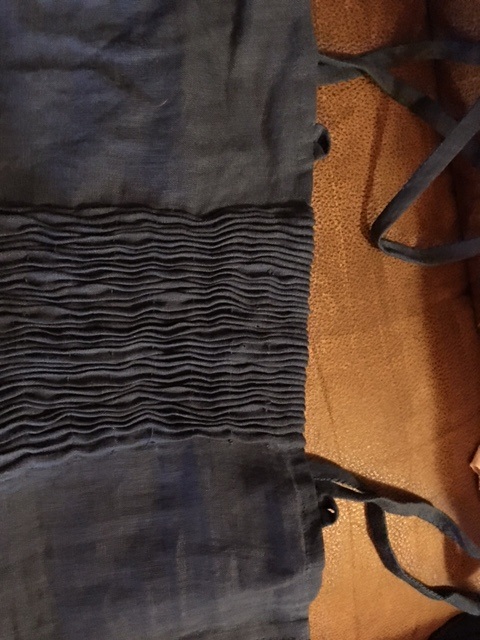
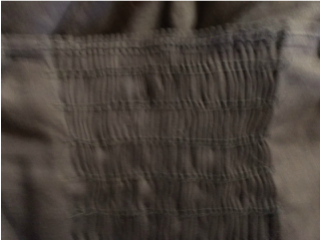
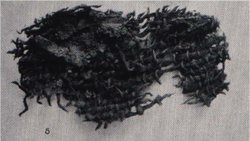
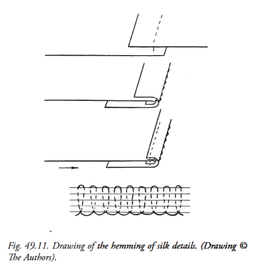
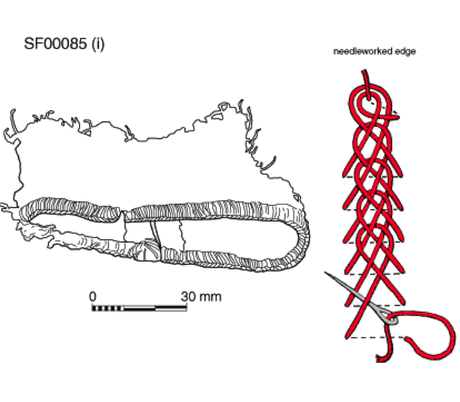
  3. While it is common to see sprawling herringbone stitch on the outside of seams in reenactment, this practice is not supported by evidence (nor is it actually practical, as the constant loops of the stitch can sometimes twist seams).  This practice comes from a misinterpretation of evidence from Mammen and I discuss it HERE and HERE. 
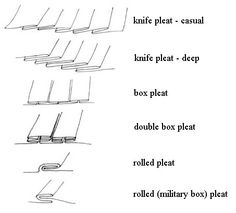
  4. Since herringbone stitch is out, how do you embellish a garment?  I have ideas in a two part series of articles that start HERE. The article covers braids, cords, and trim made of silk fabric. 
  5. Another option for decoration is tablet weaving, but keep in mind that period tablet weave tends to be very narrow and made of fine yarn.  We see more complex methods, such as brocading, than we do simple turn-based patterns.  If you plan to weave something, and are looking for accuracy, it is good to verify that the pattern you are working from is from the current state of research.  Many brocade patterns have been revamped into turn-based patterns and the effect is so vastly different that it really is not the same thing at all.  Silvia Asiling has a fantastic example of this on her site HERE.
  6. Remember that you need not add decoration at all!!!  The quality of your textiles is often a better indicator of the status of your persona.  Add some jewelry or other accessories (time/place/status specific) and you can be of the highest status without the need to clutter your silhouette with “Viking-esque” popular cultural items.
  7. Leather accessories – While we commonly associate belts and belt pouches with everyone in medieval or early medieval period, it would be good to look into whether this is actually something your persona would have had.  In many cases, women might not have work belts at all, and for men there is a tendency to go overly large and overly long with both belts and pouches (often, large belt buckles are for horse harness).  There is some great research on men’s belts HERE.
  8. Proper headwear can make or break an outfit.  It is good to invest some research time into this before deciding what is proper for your persona.  There are reenactor myths that Christian Viking women covered their hair with a veil and that Pagans never did, and that statement is not supported by evidence.  A veil can be an item of fashion and practicality as well as an element of faith.  At times, it is possible that women chose to cover their hair for practical reasons (such as keeping smoke out of your hair or the sun from baking your head), and not cover it at others.
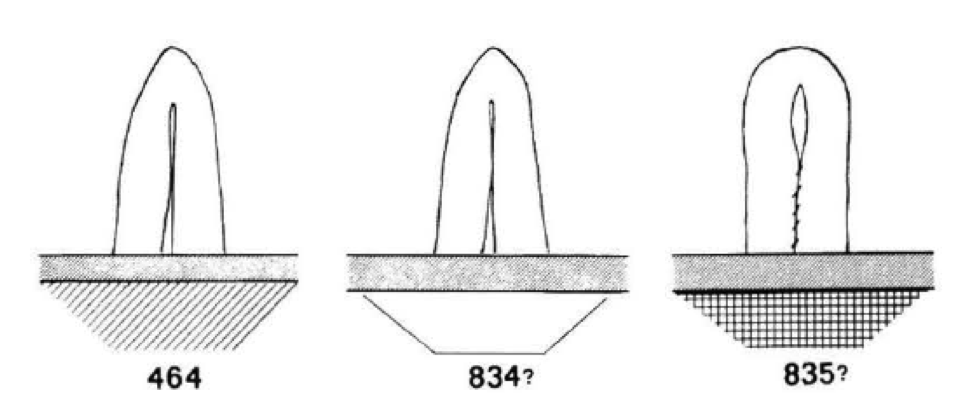
  9. Heavy swags of beads with multiple strands or bead spreaders are exceedingly uncommon in the general Viking period.  Some graves that are wealthy enough for oval brooches have no beads at all.  At Birka, we see an average of 22.7 beads in graves (and many of those are small), and at Hedeby, the average is only 8.3 beads.  You need not break the bank to buy piles of beads to follow popular modern conceptions of what looks “Viking”.  Starting with a few handmade beads and working up a collection of accurate types is very appropriate.  Some of my bead research can be found HERE.
  10. Heavy make-up (Heilung style), use of leather and leather armor (especially as “clothing”), knee-high boots, and ragged pelts slung over the shoulders or worn as cloaks are items of fantasy.  If your goal is accuracy, I would step away from these items and work towards grounding your kit in the evidence.

I have a number of articles here on my blog that can help sort additional items out.  They can be found the topics of Viking Costume: Beyond the Myth and Viking Textiles – Looking Deeper.  For excellent articles on costume I recommend Hilde Thunem and Susanna Broome.  For fantastic research on armor, weapons, leather goods, and more, I highly suggest David Stříbrný’s site.
 
Given that most of us do not launch right into high-end historic reenactment, we can take our time, start simple, and thoughtfully develop the details of our persona (time, culture, location, status, wealth, occupation, and circumstance) and build out from there, making upgrades or adding finer details as we go.


4 Comments

Musings (with nothing yet to back it up)

10/29/2018

1 Comment

 
Normally I have an idea and then I research the snot out of it and then I come to a conclusion and then post it here.  Right now I don't have time to hit the books, but a conversation this weekend with someone about the Hedeby dress made me start to think and I want to save these thoughts until I have time to look at the evidence in a new light.  (In fact, this might already be answered, but I just don't have time to dig right now. lol)

What I am wondering is was the dart in the Hedeby dress made before or after the application of the braid decoration.  In Hägg's Textilien und Tracht in Haithbu und Schleswig, she discusses the idea that the aprondress (fragments H14) had more than one life, that it was worn as an aprondress and then later reused and worn under layers (and under a belt at that time).  If that were true (though I am not sure how we can really tell that, but it definitely is fascinating to consider), then perhaps a woman of status had the garment for a time and then it was cast off and a servant or someone else wore it as a body layer under a dress to help retain warmth.  This led me to think about the weird external dart.  Can we tell from the evidence that this dart was created and then the braid was sewn over it, or, perhaps, did the original dress have the braid applied and at a later time, someone added that dart below it for some reason?

Yeah, I need to look at this all again, when I have more time than I do right now (because really, I don't have much time for anything at the moment)!
1 Comment

Aprondress Cut and Construction

8/20/2018

2 Comments

 
Frequently people ask me how I make my aprondresses.  The fabric remains for these garments are few (at least in terms of things on which we can base a pattern), which leaves open great possibilities for experimental archaeology and trying to think like a Viking Age woman to help us decipher the evidence and make our best reconstructions.  (If you are unfamiliar with the evidence, please check out Hilde Thunem's blog which has the absolute best collection of data that has been done to date for these garments.  ​http://urd.priv.no/viking/smokkr.html )

I have gone through a number of variations for design on this dress over the years, and will share my current favorites below.  I do want to make one comment though regarding terminology here.  The word "aprondress" was coined by a reenactor.  This is not something that shows up in the earlier records for textiles or digs.  It is, in fact, very much a misnomer and tends to create confusion when people truncate it to "apron".  I do absolutely use the term aprondress because everyone knows what I mean when I say that, but I want to make it clear that it is not at all an "apron" in the modern sense and the word "aprondress" should not be shortened (just to avoid further confusion).  Other words you will see are smokkr, hangerock, tragerock, suspended skirt and even pinafore.

Now that I have that out of my system, let us talk about how I currently choose to reconstruct the garments, and why.

Until a few years ago, one of my favorite diagrams was the one below.  This cutting method is extremely economical when it comes to textile use, and makes for a very flattering, slim-bodied garment.  The first few I did made use of the full width of fabric and I ended up with these billowing hemlines that, even in my early days at this, read as "wrong" to me, so I corrected that by narrowing the bottom of both the gores and the body panels.  
Picture
Slim dress worn. (The sash, belt favor and belt all have traditional SCA uses, which is why I am wearing them, they have nothing to do with Viking Age anything. lol)
Picture
I made maybe a dozen dresses like that over the years. One has to sort of slither into them, as the body is pretty fitted (and the back seam allows for additional tailoring at the waist), but they were certainly nicely fitted and pretty.  I still explored other styles, but that was one of my go-to items until I started weaving.

Spinning and weaving gave me an entirely new perspective on pretty much everything I was doing with Viking Age clothing.  It took working with the textile process to really make me understand how precious, and how important, cloth was in period.  The time investment in crafting one dress, by historic methods, was steep.  Realistically, if had more than a couple of garments, I was a lucky woman indeed!

This made me rethink my entire process for crafting clothing.  Any garment that I would have had in period would need to be crafted with life's changes in mind, because I would likely own the item for several years before it was damaged enough to be repurposed into other items, or cast off for someone else to wear.  This means I need to consider weight gain or loss, as well as pregnancy, with each item.  (And yes, this also helped me start to "get over myself" and my modern mentality when it comes to fit of clothing.)

Eventually I tested out the patterning diagram shown below.  This creates a very, very simple garment (three seams and two hems).  I did allow myself some tailoring on the top of the back panels only, as well as a bit down the center back.  The result is what I call my Second Breakfast Dresses.  They are comfortable, have silhouette that seems to conform with period icons, and it can accommodate some life changes.
​
Picture
Picture

My current favorite pattern is a slightly more complex variation of the one above.  It was inspired by tailoring from Hedeby as well as Inga Hägg's comparison of Hedeby garments to those from later Herjolfsnes.  As with the above example, I do allow myself some subtle tailoring to the upper back of the garment, while preferring a looser fit to the front.  This works for both flat-front dresses and those with pleats (see my pleated dress using this pattern here ​http://awanderingelf.weebly.com/blog-my-journey/looking-deeper-the-problem-with-pleats ).
Picture
Picture
Picture
What you can see from the images below (the dark purple wool dress) is that there is some shaping to the back, while I have a bit of room in the front.  I have made several of these to date, in both linen and wool, and have to say that at this time, these are my favorites.
Picture
Taking Lady Petra as an apprentice.
Picture
Photo by Amie Sparrow (yes, this is at home with my cats.... what of it! )
Picture
Photo of me teaching at Pennsic 47, this helps to show the silhouette of the garment. Photo by Monica.
Picture
One other thing to keep in mind, when laying out your pattern on your fabric is that, in period, they did not seem to have the modern hang-ups about direction of grain when it comes to patterning things. The Hedeby garment had the grain running from side to side on the panels, while on the Køstrup dress it ran vertically.  My suggestion is that you make the best use of your yardage, in the best way possible, when crafting your garments.

And lastly, just because I have a clear (current) favorite, does not mean that this is the only way to make a garment.  (It also does not mean that I will stop experimenting.)  I think that in period there were many possible configurations, and while some might make use of more blocky construction, and others might be more tailored, some could use gores or godets,  I think that they all likely made good use of the textiles with little waste, and I feel strongly they they all very likely could be worn during more than one phase of life.  (Heck, adding or removing pleats could even help assist with fitting life's changes.)  

2 Comments

Those Pesky Straps

5/14/2018

0 Comments

 
Aprondresses are very simple and very quick to make, depending on which pattern you choose.  The fit of the straps, however, can be something that drives people completely insane over time.  If you find that you are continually futzing with your straps, here are a few things you might want to look at to help troubleshoot the source of your problems.  Note that most people blame brooches, but they were historically large and heavy for the most part.  This often causes reenactors to initially choose brooches from other eras or locations to reduce size and weight, because they worry about them dragging the dress down, but a well fitted dress, with properly sized straps, make even the largest brooches feel nonexistant when worn.
​
Picture
Many of the tips below will require you to test and re-test a garment and strap length.  If you want to quickly test out the length of the straps without having to remove them from the dress and re-attach, you can just add a few sturdy whipstitches to the loop end of the long strap to effectively shorten them.  (See diagram to the left.) This is also a great tip to use if you swap out between different sets of brooches that might have different pin lengths.

  • Fit of the dress:  I will always recommend looking at this first.  My dresses range from very loose, to somewhat more fitted (mostly due to weight gain, lol).  But the top hem of the dress is always fitted against my body (sometimes the whole bust area is fitted as well, but not always).  If I slip into the dress, I am in no danger of it falling down before I can get my brooches on.  You can easily test this by taking a couple of temporary tucks in the dress, adjusting the length of the straps, and then seeing if you are still having issues.

    If the tucks in the dress take care of your issue, you can open up a few seams and take the garment in, or even consider adding some tiny pleats in the front such as we see in the Kostrup dress.
  • Fabric: What fabric are your straps made from?  What fabric is the dress?  In archeological example, we see that often the straps do not match the dress, with linen straps and wool dresses sometimes found.  Linen is sturdy and, if it is quality linen, has little stretch.  (Some of the colored linen at Joanns, as well as that from some inexpensive vendors, is very short staple, meaning that the linen fibre is chopped up to bits and processed like cotton.  This will stretch more than other types of linen and might need some reinforcement.)  You can replace the current straps with stronger ones, or add a linen cord or heavier linen or even sturdy silk cloth core to the straps to help eliminate stretch.  On the "Viking Clothing (SCA-Style)" Facebook group, Astri Bryde recommends using the selvedge in the straps to help combat stretch.  I personally find that suggestion to be brilliant as most modern selvedges tend to be very sturdy. 

    If the dress itself is stretching (I have one wool dress that is somewhat loosely woven, and it stretches like crazy with heavy brooches), then add a bit of linen to the top of the dress itself inside, or even add a more sturdy tablet woven band or strip of silk to the outside to combat this stretch.  (A really stretchy cloth might require you to line the entire bust area with something more sturdy, but take it one step at a time when testing solutions.)

  • Build: Everyone is built different.  Sometimes sloping shoulders or other things might mean that you need to angle the straps differently on your dresses.  You can change this angle by setting the straps closer together in the back than the front and testing that out.
 
  • Are you using short front loops on the dress or are you pinning directly through the fabric of the garment?  Using loops allows you to strain your cloth less, and preserve it longer (constantly re-pinning through the cloth itself will both damage and stretch your precious aprondress textiles).
​
  • Construction of straps:  There are several ways historically to fold the cloth to create the straps.  My personal favorite is to fold the cloth in half lengthwise and press it, and then fold each of those ends in and press again and whip stitch the edge closed.  This looks like double fold bias tape, but is not cut on the bias (straps cut on the bias would be very, very stretchy).  Also, if you have the option to cut the straps on the grain, rather than across it, that might eliminate some issues.
​
Picture
I wear large, heavy, double shell brooches, and my dresses and brooches tend to stay put once I get the fitting fine-tuned.
0 Comments

Lady in Blue

3/8/2017

1 Comment

 
I have wonderful friends who gifted me with a copy of Bundled Up in Blue last fall.  It is a great museum exhibit book that covers many details of a Viking grave find in Iceland.  I was very happy last night to see the dress information now available online.  You can find it here!

https://northernwomen.org/project-2/


1 Comment

Hilde Thunem's Updates

1/11/2017

0 Comments

 
If you ask me about Viking clothing, the very first place I will recommend to you to look as Hilde Thunem's website.  She has recently done some updates to her popular Smokkr (aprondress) article and has split her own experiments with different styles onto another page.

I highly recommend checking her fantastic research out!

http://urd.priv.no/viking/

0 Comments

New Class:  Deeper Look at Textiles & Trim of Viking Age Dress

4/5/2016

0 Comments

 
I have wanted for some time now to work up a class on Viking Era women's clothing, but stalled because I was not sure of how I wanted to approach the subject matter.  A whole class could be devoted to interpretations of the aprondress, for example.  There are quite a few people who teach excellent beginners courses on layers, colors and getting the right look, as there are others who are teaching "next steps" classes (I took a fantastic one at Pennsic last year). 

The class I will be offering soon will be a bit more specific and a bit more research oriented.  I hope to give a better understanding of the investment that textiles were in period and use that to give one a better perspective on how to use them.  Having an understanding of the daily lives of these women, and how valuable textiles were at the time, will give a better foundation for our projects.

Part of the class will cover what period fabrics looked like and how to try to determine which modern substitutions would be best.  Also covered will be examples of details and embellishments for garments that are based on extant items.  The themes that will be covered for each item are Provenance, Perspective, Plausibility, Practicality and Proportion.  As always, there will be a lot of tactile samples of items to be passed around to help illustrate textiles, ideas and techniques. 

The official listing for Pennsic is:

Deeper Look at Textiles & Trim of Viking Age Dress
By looking deeper at both the textiles and the details from extant items, this class aims to help individuals make informed choices for crafting their garments. Tactile examples will clarify the weaves and weight of period fabrics and there will also be discussion of possible modern substitutions. Additionally, practical details for finishing or embellishing garments will also be explored and their history investigated.  The goal of this class is to help the individual understand how daily life during the Viking Age could affect how textiles were crafted and worn.

I plan to teach twice at Pennsic and hopefully once at War Practice.  Also on the agenda (hopefully) will be Atlantia University and AEthelemarc AEcademy (both this fall).

(Note, this class is geared towards women's garments because I will often be using aprodresses as examples for various things, but a great deal of the class can be applied to any garments from the period!)
0 Comments

Looking Deeper:  The Problem with Pleats

3/24/2016

5 Comments

 
I recently finished my first pleated-front aprondress.  I made this garment because Grave C27997 from Kaupang had layered smokkrs (aprondresses), with the innermost layer being a pleated garment.  (Ingstad, 162)  I love the look of the pleated dress layered under my handwoven, unpleated dress, but also decided that I very much like the garment on its own as well.

This version was made from lightweight linen, with the idea of being able to wear the garments layered even in warmer weather.  The cutting layout I chose was quite simple and produced a garment that has plenty of room for movement, while not giving too much volume to the hemline.  I added a bit of tailoring to the top of the side gores, but this is sill a loose, comfortable garment.  After making my dress, and wearing it, I realized there is s something exceptionally simple and functional about these pleated garments.  Pleats would be the absolute simplest manner of taking in a dress that is now too large, or letting out one in which you might need more room. 

Picture
Picture
Dress side from the inside
Picture
Dress side from the outside
Picture
Finished dress
Picture
Pleated dress under wool dress
Hilde Thunem has written rather extensively about the Kostrup dress, and her article can be found here: http://urd.priv.no/viking/kostrup.html  I will not reiterate her evidence in my piece, but intend to only add my thoughts on pleating that I see used in recreations, and what makes sense to me and what does not.

Before crafting my pleats I did some experimentation to get the size of the pleats correct.  Even though my dress is linen, I did experiment as well with wool.  I also did some research on my own on the extant pleated smokkrs from Kaupang, Kostrup and Vangsnes. 

The dress at Kaupang had pleats that were 4-5mm deep and was made from fine broken diamond twill (approx 88 threads per inch in the warp and 38 in the weft).  This textile is highly fragmented. 

Vangsnes B5265 has a larger fragment of pleated fabric as can be seen in the image below.  This was a wool tabby that had pleats 2-3mm deep.

Kostrup has the most compelling fragments and Hilde Thunem has the best images of those here:  http://urd.priv.no/viking/kostrup.html  That garment, like Vangsnes, was also a wool tabby.  The thread count is approximately 66 threads per inch in the warp and 25 in the weft.  The pleats there, according to Hilde Thunem, are 2-3 mm deep and 3 mm wide.  There is not enough left of the fabric to let us know how far down the pleats ran.


Picture
Pleated fabric from Vangsnes


AnoThe Problem with Pleats


None of these dresses give much in the way of clues about how the pleats were crafted or secured. Things we do know are:
  • There is no evidence of thread or stitching holding the pleats.
  • There is no evidence of any sort of band sewn to the top or back of the pleats to let them keep their shape.
  • There is lack of noticeable wear on the pleats and the fabric still has visible weave and texture.
  • Two of the pleated fragments are hemmed at the top before pleating.
  • The pleats are very narrow (2-5mm across all three samples).  Kostrup and Vangsnes are clearly stacked closely together and do not appear to lay flat.

Using Thread to Draw the Pleats
One theory, suggested by Rasmussen and Lønborg is that a linen thread was used to draw up and secure the pleats.  While no thread remains, linen might well have degraded in the grave leaving little or no trace.  Further, if indeed the garment was made in this manner it makes sense that a thread used for that purpose be of linen, rather than wool as wool would try to stick to itself and would catch making it difficult to form the pleats.  Linen, especially if waxed, glides though wool fabric easily.

The problem I have with this is after experimenting with this is that those pleats have a tendency to shift along the string with wear (unless they are very compact to begin with).  It is also very easy to break the the pleating thread or create a small pull or hole in the ground fabric.  However, it would be a fairly quick way to make the pleats and to secure them.

Steaming the Pleats
Quite a few people in online forums have have suggested that the pleats were set by steaming, causing the wool fabric to felt, thereby holding the pleats.  While steam can definitely be used to help set a pleat, it would not felt a textile to an extent that it would hold the shape of the pleats during wear at the edge of a garment (not and still have the individual threads in the weave still be plainly visible).

What do I mean by this?  If you make a wool skirt, create pleats and set them into a waistband and then steam it, those pleats will last some time.  However, without the waistband there, they will absolutely not hold shape to the waist, or in the case of an aprondress, hold shape at the bust.  The only way to get the pleats to maintain that shape would be to take the felting process much further than the evidence shows us as you can still see the weave in the cloth on these finds.  Even if one thought the garment was felted, I do not think there is enough felting to maintain shape without some other form of structural support.

Another option for steaming would be a more loose garment.  However, over time the weight of the wool itself would pull the pleats open, possibly in a sagging U shape to some extent.

Weaving/Steaming the Pleats
Another, more recent theory, suggested by Nille Glaesel is that the pleated portion of the dress is created on the loom.  The idea is that while weaving the dress fabric an additional linen weft is inserted periodically and then drawn together after weaving to create the pleats.  The textile is then steamed to set the the pleats and the strings are removed.  The problem with this is the same as I mentioned above.  The pleats are still not capable of holding shape at the bust.  Nille had to add a band to secure hers.  (Further, as a weaver, I find this far more tedious of a process than simply drawing the pleats on a thread after the garment is crafted.)

Bands at the Top or Behind
I see no clear evidence of a band sewn to the top of the garment, or even from the back, to keep the pleats from stretching open with wear though Nille Glaesel believes that blue linen found in the grave served that purpose.  My issue with this theory is that the reasoning behind weaving the pleats in to begin with is that there were no threads or holes left from a drawing thread or stabilizing thread.  Yet an assumption is being made that all of the threads holding this band on have since disappeared. 

Stabilizing Stitch
While there is no more evidence of this stitch than of the drawing thread, this is a practical solution that, to me, is at least plausible.  A careful seamstress could sew in the drawing thread without piercing the yarn of the textile (or, at least, without often doing it).  Likewise, Stitches added from behind could penetrate the web of the textile, without impaling individual weaving threads.  While I think it unlikely that all of this linen yarn would disappear in the grave, I find it far more likely than there being an entire band, plus its stitching, that disintegrated over time.

This is the solution I ended up using (and it is the same conclusion that others have come to as well).  We do not have the evidence to say that it was definitively done in this manner, but I feel that it is still more than plausible (and more plausible than some other possible solutions). 

I chose to use a method similar to that used on later Norwegian clothing where the pleats are drawn up on a thread, and whip stitched in place.

Picture
Picture
Whip stitching the pleats from the inside.
Picture
What About Other Types of Pleats

This one is touchy.  I have seem beautiful versions of these pleated smokkrs that involve knife or box pleats.  Frequently these pleats are stitched down with long rows of stitching that run vertically on the pleat.  Occasionally, these pleats are used to create additional tailoring in the garment.  All of these pleats lay flat, and are typically also encased in bands of some sort.

Unfortunately, I have seen no evidence for any of these types of pleats on any Viking garments.  (If you have seen something like this, I would love to see the sources.  I have looked through my collections of materials to no avail.)  While I do recognize that the "Swedish Poofy Pants" likely had some sort of pleating at the waist, we do not what what form that pleating took.  It might well have also been some sort of very tiny pleats or gathers.

I have to think that sometimes modern ideals guide these choices.  I know that there was a time that I never would have worn a pleated front dress (which looks to me very much like a maternity gown), preferring instead garments that were more tailored and flattering to a modern eye. 

Another reason that might prompt these choices is the wrong choice of fabric (and sometimes, this is unavoidable, as the right wools are frequently difficult to obtain).  The thread counts in the extant garments are very high.  These were fine wool textiles.  What we often buy as reenactors are much more coarse, and often our cloth also often has a brushed surface.  Thick fulled fabric will produce very bulky pleats that would appear quite off if they could even form a small enough pleat at all.  The bulk produced by these textiles can be very off-putting to many.  The fabrics to sometimes tend to conform nicely as deep, flat pleats, and that might be the reasoning behind some choices.


I plan to make another pleated dress out of a mid-weight linen for Pennsic and then eventually a wool one.  I enjoy the dress I made more than I thought I would and hope to explore additional possibilities for both the pleating and over all construction of the dress with each iteration.


References:

Blindheim, Charlotte. Kaupang-funnene, bind II, (University of Oslo), 1999.

Glaesel, Nille.  "The Kostrup Aprondress", 2015. 

Holm-Olsen, Inger Marie. “Noen gravfunn fra Vestlandet som kaster lys over vikingtidens kvinnedrakt”, Viking, 39, 1976.

Ingstad, Anne Stein.  “Two Women’s Graves with Textiles from Kaupang,” Universitetets Oldsaksamling 150 år, Jubileumsårbok, 1979

Rasmussen, Liisa and Lønborg, Bjarne. Dragtrester i grav ACQ, Køstrup, 1993.

Thunem, Hilde.  "Viking Women: Aprondress."  January 2011. http://urd.priv.no/viking/smokkr.html

Thunem, Hilde. "The aprondress from Kostrup (grave ACQ)."  April 2015.  http://urd.priv.no/viking/kostrup.html

Vedeler, Marianne, ‘Pleated Fragments of Clothing from Norway’, NESAT VIII, 1997.

5 Comments

Conspicuous Consumption and the Viking Age

3/16/2016

2 Comments

 
I am once again exploring new ways of patterning Viking Age garments.  I always have kept in mind the need to make as little waste as possible when patterning, but am looking to explore options that allow for even less fabric usage.  Another part of this experiment is also to look at the different lines and silhouette that I can get in a garment, and to possibly step further away from a modern mindset.

My early Viking aprondresses are pretty full at the hem.  I like full, swishy skirts and that carried over to my patterning.  My first dress had almost no waste at all and made a comfortable dress with a very, very full skirt. The front and back panels have flared bottom edges (based on the Hedeby fragment) and full triangular gores added to the sides.  I actually pretty quickly decided that the skirt looked odd, with such a full hem, and I took the gores out and made them more narrow.  I was more happy with it then, but looking at it now, I still think that the bottom hem is too full in proportion to the rest of the dress.

Picture
Pattern for my first aprondress (I think I might even have had a back gore in this one at one point).
When I look at examples from Hedeby, the gores found there relatively narrow (even if you use two together), compared to some I have made.  The aprondress fragment also has a subtle flare than I tend to use.  Given that many people wear aprondresses that do not reach the floor, I think that a exceedingly full hem becomes unnecessary as movement would not be hindered by the skirt.
Picture
Aprondress fragment from Hedeby
Picture
Gore from Hedeby
I have seen arguments about the width of hems in the period online.  Unfortunately, we, at this time, cannot truly settle that based on the evidence we currently have.  Frequently, someone will cite "conspicuous consumption" as the reasoning behind such full dresses.  I will grant that could well come into play with textiles in later time periods, but during the Viking age we are still looking at the possibility of a great deal of textiles still being woven in-home.  (And it is often at this point that it is mentioned that the families were large and it was more than one person doing the spinning and weaving.  Yes, but, those people then also need clothing.)  Even with the possibility of some local textile production (which has been considered possible for sites such as Birka), the time involved in crafting the cloth is still very high, and would still make it costly to purchase.

Imported fabrics were also available to those that could afford them.  I can only imagine that the cost for these goods was steep.  While I agree that a wealthy woman would likely had a more full hemline that that of a poor farmer's wife, I still do not think that, during this time period, that the skirts showed the excess use of textiles the way they would later in time.

So, based on my thoughts above, I am playing with additional patterns and making garments to see what I think of them after wearing them for a time.  Further, I am looking to play with a more subtle tailoring in the garments, to try to further step away from the cotehardie silhouette or an overall hourglass shape.

The beginning of this process is a dress I recently made with a pleated front based on the finds at Kaupang, Kostrop and Vangsnes.  I wear this now under my handwoven dress (as the pleated dress from Kaupang was found under an aprondress with a plain front).  The cut on it is only very slightly tailored from the bust to the waist at the side panels.  I am quite surprised at how much I like the final look of the garment.  The hem is not as excessive as some I have used in the past and this can be cut with absolutely no waste at all.

Picture
My pleated aprondress cutting diagram. I tailored the tops of the side panels only a tiny bit from the bust to the waist. The overall fit is still quite loose.
 I used a bit of leftover linen from a project 15 years ago last night to cut an exceptionally simple dress with a narrow hem (approx 68 inches, compared to the 34 inch bust while many of my previous dresses had hems in excess of 108 inches).  I will put it together tonight and give it a test this week to see what I think of the garment. 
Picture
Exceptionally simple aprondress cutting diagram.
Picture
In the photo is the aprondress cut from the scrap linen mentioned above. It only has a little tailoring in the back, and none on the front panel. It could be more tailored, but that would make for a less versatile garment. The hem is narrow compared to many of my other dresses, but is just wide enough to allow for a full range of movement.
2 Comments

Viking Clothing: A Deeper Look at Edges (Part 2)

10/9/2015

1 Comment

 
Part 1 of this article, covering Cords & Braids, can be found HERE.

Silk Binding

Silks were expensive imports and reflected the wealth and status of the wearer.  Many of these silks were cut into very narrow strips and applied as bindings or trim to garments.  The silks used in this manner were typically cut .5-1.9 cm wide (some were cut in the warp direction, some weft).  They were applied to both wool and linen garments. 

Some silk strips, as shown at Birka and with the Pskov cuffs, were used as a narrow binding on the edge of the fabric, while others were used flat against a garment (many of the stripes from Oseberg show this type of use).  In addition to these these sites, graves at Mammen, Haugen Rolvsoy, Tuna and Turinge also have silk strips.  (Vedeler, p7)

Both plain weave and samite silks were found in graves, with the latter being elaborately patterned.

Silk Binding - Extant Examples

Birka
Graves 464, 834 and 835 all have fragments of silk that were possibly attached to the tops of wool smokkrs.  464 is described as a narrow binding of silk with straps also made of silk twill attached to a dark blue-green wool smokkr.  834 had a scrap of silk binding that might have been attached to the dress or that might have been used as a strap to hold tools.  835 had a wool smokkr with linen loop.  A silk band was found there that might have been on the smokkr or might have been used to hang tools.

Birka III, p29, p78-79, p158-159;  Kvinnodräkten i Birka, p69.  Image from Kvinnodräkten i Birka and photo from Birka III (shows fragment from 834)

Picture
Picture
Oseberg
This rich grave yielded numerous narrow bands of silk samite that were cut into long strips.  These strips have the long edges folded in and there are needle holes show that they were once applied to fabric (traces of both wool and linen have been found on the bands).

Vedeler, p7.  Photos from Unimus.no.


Picture
Picture
Picture

​Hedeby
Grave 159/1960 has a dense, shiny tabby silk that possibly was a decorative band at the top of an aprondress.
Pskov
This Viking age grave contained both a dress and an underdress.  The over dress (referred to sometimes as a sarafan, and sometimes as a smokkr) had strips of silk applied in bands to the top.  That decorative portion of the dress was then trimmed with a very narrow, blue silk binding.  The binding was .7cm wide.

The underdress had wide silk cuffs and narrow bands of silk at the bottom edge of those (and potentially a band of silk at the hem as well).  The band used to form the hem was 3cm wide and folded around the edge as in the diagram below.  The sewn edge was only .5cm wide.

Reference and photos: Zubkova, et. Al.

Picture
Cuff from Pskov underdress.
Picture

Stitching

York - High Ousegate
A sleeve cuff of chevron twill wool has Osenstitch applied to the very edge.  The yarn used is glossy, smoothly spun wool, plied Z2S.

Resource and image: Archaeology of York, Web Series, No. 3, The Textiles by Penelope Walton Rogers

Picture
Part three of this article will be online soon.  It will cover tips and tricks for making use of these edging techniques and will show samples of edges I have finished in this manner myself.

Resources

Christensen, Arne Emil and Nockert, Margareta. Osebergfunnet: bind iv, Tekstilene (Universitetet i Oslo), 2006.

Geijer, Agnes.  Birka III, Die Textilefunde aus Den Grabern.  Uppsala,1938.

Hägg, Inga.  Die Textilefunde aus dem Hafen von Haithabu (Karl Wachlotz Verlag). 1984.

Hägg, Inga.  Die Textilefunde aus der Siedlung und us den Gräbern von Haithabu (Karl Wachlotz Verlag). 1991.

Historiska museet 2011.

Holm-Olsen, Inger Marie.  “Noen Gravfunn Fra Vestlandet Some Kaster Lys Over Vikingtidens Kvinnedrakt,” Viking Bind XXXIX, 1976.

Ingstad, Anne Stein.  "The Textiles in the Oseberg Ship". http://forest.gen.nz/Medieval/articles/Oseberg/textiles/TEXTILE.HTM

Ingstad, Anne Stein. “Two Women’s Graves with Textiles from Kaupang”

Jones, Heather Rose. "Archeological Sewing". 2004.  http://heatherrosejones.com/archaeologicalsewing/wool.html

Skre, Dagfinn.  Things from the Town: Artefacts and Inhabitants in Viking-Age Kaupang (Aarhus University Press), 2011.

Thunem, Hilde.  "Viking Women: Aprondress."  January 2011. http://urd.priv.no/viking/smokkr.html

“Universitetsmuseenes Fotoportal,” 2013.  http://www.unimus.no/foto/

Walton, P. "Textile Production at 16-22 Coppergate." The Archaeology of York Volume 17: The Small Finds.  1977.

Zubkova, E.S, Orinskaya, O.V, and Mikhailov, K.A. “Studies of the Textiles from the Excavation of Pskov in 2006,” NESAT X, 2009.

Zubkova, E.S, Orinskaya, O.V., and Likhachev, D.  “New Discovery of Viking Age Clothing from Pskon, Russia.”  (Notes and summary by Perer Beatson) http://members.ozemail.com.au/~chrisandpeter/sarafan/sarafan.htm

Walton Rogers, Penelope. “The Textiles,” Archaeology of York (28-29 High Ousegate), Web Series, No. 3.

1 Comment
<<Previous

    About Me

    I am mother to a billion cats and am on journey to recreate the past via costume, textiles, culture and food.

    A Wandering Elf participates in the Amazon Associates program and a small commission is earned on qualifying purchases. 
    ​

    Archives

    March 2023
    February 2023
    November 2022
    October 2022
    September 2022
    June 2022
    May 2022
    March 2022
    March 2021
    February 2021
    September 2020
    August 2020
    July 2020
    June 2020
    May 2020
    March 2020
    January 2020
    December 2019
    November 2019
    September 2019
    July 2019
    June 2019
    May 2019
    April 2019
    March 2019
    February 2019
    January 2019
    November 2018
    October 2018
    September 2018
    August 2018
    July 2018
    June 2018
    May 2018
    April 2018
    March 2018
    February 2018
    January 2018
    December 2017
    November 2017
    September 2017
    August 2017
    July 2017
    June 2017
    May 2017
    April 2017
    March 2017
    February 2017
    January 2017
    December 2016
    November 2016
    October 2016
    September 2016
    August 2016
    July 2016
    June 2016
    May 2016
    April 2016
    March 2016
    February 2016
    January 2016
    December 2015
    November 2015
    October 2015
    September 2015
    August 2015
    July 2015
    June 2015
    May 2015
    April 2015
    March 2015
    February 2015
    January 2015
    December 2014
    November 2014
    October 2014
    September 2014
    August 2014
    July 2014
    June 2014
    May 2014
    April 2014
    March 2014
    February 2014
    January 2014
    December 2013
    November 2013
    October 2013
    September 2013
    August 2013
    July 2013
    June 2013
    May 2013
    April 2013
    March 2013
    February 2013
    January 2013
    December 2012
    November 2012
    October 2012
    September 2012

    Categories

    All
    12th Night
    14th Century
    AEthelmearc
    Aprondress
    Awards
    Bog Dress
    Bronze Age
    Dance
    Dance Name
    Distaff
    Dyeing
    Embroidery
    Fiber Arts
    Flax Growing
    Food
    Glass
    Haberci
    Headcoverings
    Inspirations
    In The News
    Library
    List Of Links
    Machine Embroidery
    Metal Clay
    Mid Month Inspiration
    Migration Era/Iron Age
    My Documents
    Ottoman
    Ottoman Fabrics
    Pennsic
    Publications
    Research
    Rigid Heddle
    Sca
    SCA Camping
    SCA Forestry
    Sca Name
    Sca Newcomer
    Sewing
    Sheep
    Spinning
    Textile Charts
    Tips
    Totally Not SCA
    Viking
    Viking Bead Research
    Viking Costume: Beyond The Myth
    Viking Swatch Book
    Viking Textiles Looking Deeper
    Weaving
    Wool


      Email Updates

    Subscribe to Newsletter

    Blogroll of SCA & Costume Bloggers

    Below is a collection of some of my favorite places online to look for SCA and historic costuming information.

    More Amie Sparrow - 16th Century German Costuming


    Gianetta Veronese - SCA and Costuming Blog

    Grazia Morgano - 16th Century A&S

    Mistress Sahra -Dress From Medieval Turku 

    Hibernaatiopesäke

    Loose Threads: Cathy's Costume Blog

    Mistress Mathilde Bourrette - By My Measure: 14th and 15th Century Costuming

    More than Cod: Exploring Medieval Norway

    RSS Feed


Proudly powered by Weebly