A Wandering Elf
  • A Wandering Elf
  • Blog: My Journey
  • Iron Age Celtic Studies
  • A Wandering Elf in the Woods
  • Classes
  • Resources: Sheep & Wool
  • Resources: Costume and Textiles
  • Resources: Migration Era
  • Resources: Historic Glass Beads

Rigid Heddle Weaving for SCA Use

12/29/2014

1 Comment

 
Picture
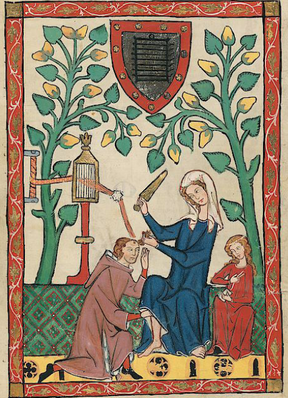
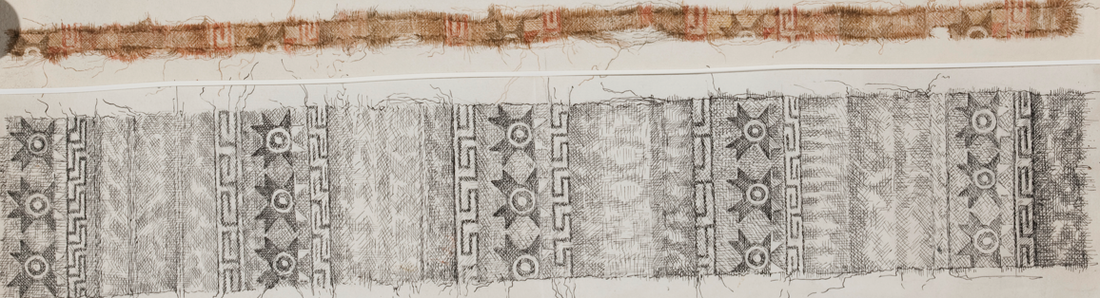
Band weaving from the Codex Manesse - 1300-1340.
A couple of days ago a reader (andy) said that he got a RH loom for Christmas and is having a hard time finding SCA appropriate projects for the loom and asked if I could post with some ideas.  While I do not at the moment have drafts or project sheets drawn up for specific projects, I can absolutely post information on things you can create (even as a new weaver) on the RH loom for the SCA!

Rigid Heddle weaving in period was used to make narrow bands (and were often used in conjunction with band looms).  While I have never seen the wide rigid heddle looms we have now from the SCA period, that does not mean that they cannot be used to produce items for SCA use, display or competitions!  RH weaving at its simplest produces a tabby woven cloth (also known as plain weave) and that structure can be seen throughout history.
Picture
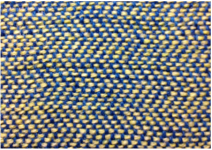
Herringbone twill woven on the RH loom. I turned the samples I did for this into pouches for my BF and for largess.
I actually would highly recommend that a new weaver first purchase a RH loom, to explore the art of weaving, before investing in a much larger (and much more costly) floor loom.  Even if one opts to move into multi-shaft weaving at a later point, the RH loom still has many uses for those who want to recreate historic items.  My suggestion for the new weaver is to undertake two things at the same time.  The first is to just put some yarn on the loom and explore!  Learn to weave, work with perfecting tension and selvedges, work with incorporating colors via stripes or plaids, and generally get comfortable with the art of weaving.  As you do this, start to explore what historic items might be of use to you, learn about the weaves common in a particular area or part of history.  You might not be able to produce a cloth with a thread count of 80 ends per inch on this type of loom, but there are many fabrics you can make with some practice!

I highly recommend either of these two books to the new weaver:
  • Hands on Rigid Heddle Weaving by Betty Lynn Davenport
  • Ashford Book of Rigid Heddle Weaving by Rowena Hart (this one is out of print for the moment, but you might come across one used at a decent price)
Both cover the basics of warping the loom and the process of weaving.  They also have a host of simple projects that can be adapted to SCA uses.  I highly recommend that one follow the instructions for direct warping the loom.  It is fast and painless and gets you weaving quickly.  This is one nice advantage a RH loom has over floor looms and one reason that I wanted a larger RH loom myself.

If you are like me, you do not want to create something just for the purpose of practicing.  You want to make something that one can actually use.  So, some starting items that I can suggest are:
  • Weave a few narrow pieces in wool (Harrisville Shetland is a fantastic 2-ply yarn that works very well in a Rigid Heddle loom).  This gives you practice time weaving, as well as the chance to get comfortable working with wool (a most fantastic fiber).  Narrow cloths can very easily be sewn up into bags or pouches!  Make them for yourself, friends or as largess!  Everyone loves handwoven goods and items like this are sure to be used and admired for many years.  (I will work on an article with specific instructions for this after I finish weaving some more fabric.  For now, there are likely quite a few tutorials for fabric pouches online.  They really are simple!)
  • If you happen to have one of the larger looms, wider fabric can be turned into coverings for benches or boxes in tents, narrow runners or small rugs for the floor or even pillows.
  • Remember that you do not need to weave the full width of the loom!  Narrow bands can be woven as straps, belts or trim.
  • With a 28-48" wide loom you could also weave enough fabric to create heavy woolen garments (remember that the highest thread count produced with one rigid heddle is 12.5 threads per inch).  This could become cloaks, hoods, hats, or even something like a tunic if you need warm weather gear.  (Depending on your loom, you might need to weave two lengths of cloth to produce enough yardage for one of these larger projects.)  Something like a Norse Aprondress would work fabulously on this type of loom if you choose a style that is more conservative of fabric!  NOTE: After weaving a piece you will need to wet-finish the garment, and this will shrink it a bit, so weave test swatches first to get an idea of how much it will shrink so that you can weave enough for your final item.

Of course, weaving, even on an RH loom, does not end with tabby!  Most looms have the ability to add a second heddle.  This allows you to weave items in plain weave twice as fine as you could previously (two 8 inch heddles would weave at 16 ends per inch, or two 12.5 would weave 25 threads per inch).  While much of the fabric from upperclass graves, even in early periods, tended to be much more fine than we often imagine, a 24 or 25 thread per inch cloth is more than suitable for Viking garments.  (I have not done much exploration on garments later in history, so that would require some research to figure out what thread count is appropriate to accurately reproduce something.)

Further, the use of a second heddle allows you the option of more complex weaves!  Yes, you can weave twill on a rigid heddle loom!  Two heddles can easily let you weave three shaft patterns with a little extra effort.  Ability to weave twill means more options for garment creation and even for narrow items like men's winnegas/wicklebander (Viking legwraps).  In some times and places, twills of various sorts were more common that tabbies.

A second heddle also allows for doubleweave, a technique that can allow you to make cloth that is twice as wide as your loom's weaving width.  (This could make an excellent cover for a chair or cot at events!)

And it does not stop there!  You can add a third heddle and move on to weaving many things that would normally require a 4 shaft loom.  If you make it to Pennsic, I believe that Dread Countess Seelie is the one that teaches how to use the rigid heddle loom to reproduce a broad range of historic textiles.  I have not made it to her classes (yet!) myself, but I know quite a few people who have and who have said only good things about her teaching.  I did get a chance one year to have her show me a bit of her weaving that was set up at war and I was quite impressed.

I will finish this article with a few additional tips specifically aimed at the new weaver:
  • Experiment a lot.  For SCA use, you will want to avoid some of the bulky knitting yarns with many plies, but if you already have those in your stash from other hobbies, use them to practice with before spending more money on better yarns.  Experiment with different brands of yarn, different types of wool (shetland, merino, etc), practice plaids and stripes, pick-up patterns.  Play around with the loom as often as possible!
  • Play with spacing of the yarn.  Try the same yarn in two different reeds and see what it does to the density of the cloth.  Wet-finish it different ways (hot water with friction, versus warm water with no agitation) to see how the final cloth differs.  Knowing this before you attempt larger projects is very useful and can help you avoid errors during finishing that might make you unhappy with your final resulting cloth.
  • I think that 2-ply fingering weight yarns work well for many SCA projects.  Try to use wool (or wool blends if that is what you have access too or can afford) when possible.  If you are making something for a competition, it is best to have an understanding of what historically would have been used for your item in period.  Put that information in your research documentation as well as information on which type of loom you would have used in period as well.  It is always know how it was done back then, even if we use a more modern means of reproduction.  Rug wool is, of course, nice for rugs!
  • Lace weight yarns (and singles) can be exceptional for projects, but might fray too much (resulting in broken threads) if you are using the RH to beat the weft into place.  If you find this is the case, use the RH to change the shed, but beat it into place with a weaving sword - a beveled piece of wood meant for packing the weft.  One can also use a pick up stick with a beveled edge for this purpose.  This will reduce friction on the yarn and will result in less broken threads.
  • Learn about colors used historically.  There are many members of the SCA who do amazing work with dyes who can guide you when it comes to learning who had what colors throughout history.  There are many modern variegated yarns that are quite appealing to the modern eye, but that are also quite wrong for recreation purposes.  Learning what colors were used historically can aid in perfecting a project (as well as making for better documentation for A&S displays).  And if you cannot resist those lovely modern yarns, there are always scarves that can be made for non-SCA holiday gifts!
  • Remember that things will go wrong.  Warp tension can be off, threads can break, you can mis-thread the loom or colors.  It will all happen at one point or another and it is all a learning experience.  learn from it and continue to weave.
  • Finally, enjoy your new art form of weaving!

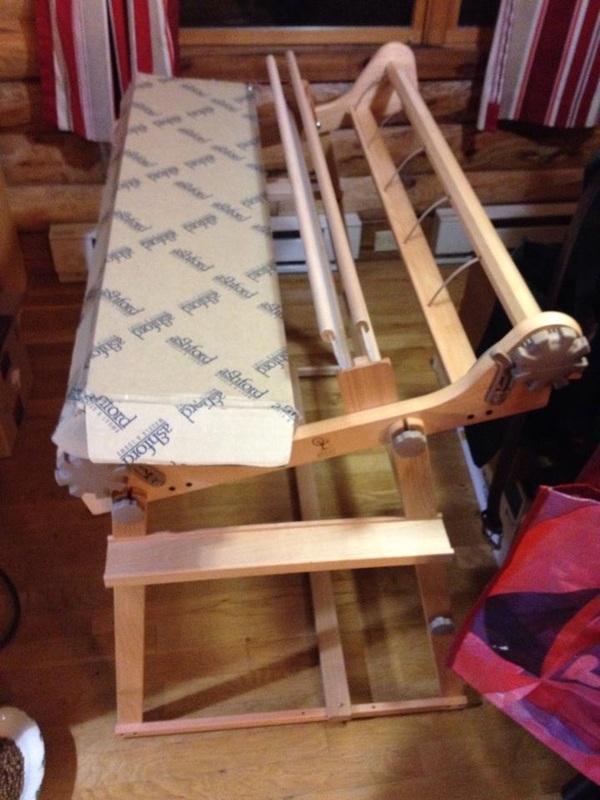
The looms that I prefer for RH weaving are my small Schacht Cricket loom and my 32" Ashford.


Picture
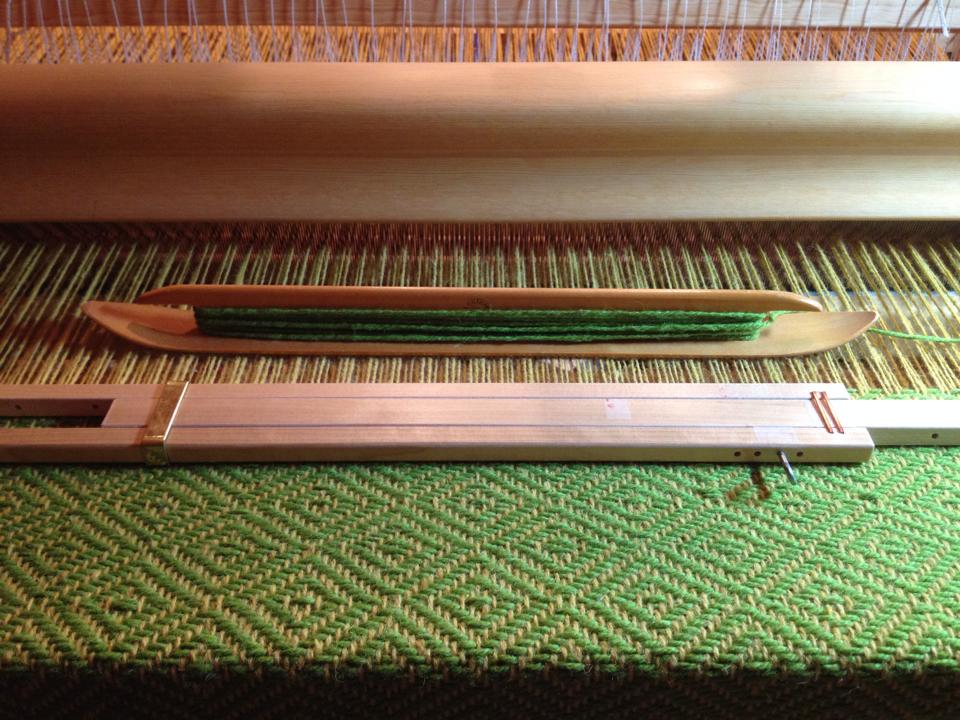
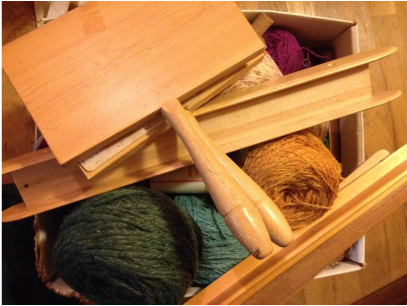
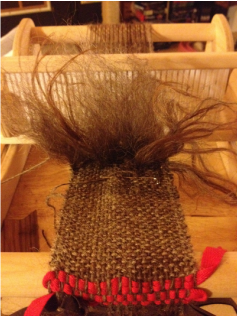
I was playing around with making Viking era fake fur trim. The warp and weft are both hand spun Icelandic tog. You can see the pin in the weaving that is being used to hold a new thread in place (one of my warp threads broke because of the friction from using the RH as a beater).
Picture
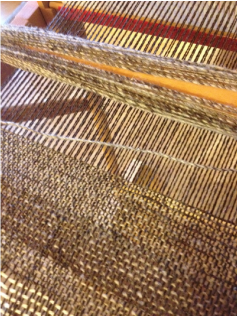
Icelandic handspun weft with Harrisville Shetland warp.
Picture
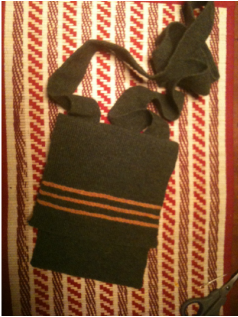
My first project on my 10" Cricket loom. I made this pouch in Harrisville Shetland wool and while the style is not period, it makes a great pouch for carrying my wallet and phone at Pennsic. I am still using this purse 5 years later! (This was a project in one of the weaving books I referenced above.)
Picture
This is the "use up all the leftovers" project. I have on the loom another Harrisville Shetland warp and am using the partial cones and balls of yarn I have laying around to weave table covers and small rugs for use in the tents at Pennsic.
1 Comment

Happy Holidays!

12/22/2014

2 Comments

 
Christmas came a bit early for me as my BF and I exchanged gifts this weekend.  He bought me a 32" wide Rigid Heddle loom!  I love to be able to do mindless weaving while we watch movies together, and have been borrowing a loom of this type for that purpose for the past year.  Now I can continue to use up my stash while making rugs and table coverings for our tents!  (And he was extra awesome and also bought the second heddle kit and two 12.5 dent reeds!)

For those new to weaving and who do not want to purchase a floor loom before they know if they enjoy weaving, I highly recommend starting with a rigid heddle loom.  There are many models on the market and they come in various sizes, including some that fold in half for traveling.  My first loom (aside from a potholder loom as a child, lol) was a Schacht Cricket loom that my mother bought me for Christmas a few years ago.  I love it and I still use it for weaving small projects, teaching others and for tablet weaving. 

The loom I have been borrowing is a Kromski Harp.  This loom folds in half for travel and has a weaving width of 32".  The stand you get get for it has an adjustable angle, which is nice, but I do not like that the ratcheting mechanism is located next to your weaving, which allows your threads to possibly get tangled in it (actually, I am not overly fond of the ratchet on this one at all).  Overall though, this weaves well and also
also has an option for a second heddle block (which allows you to use two rigid heddles at once to weave finer fabrics or even twills). 

The new loom I was gifted for Christmas is the Ashford Rigid Heddle loom, also 32".  This is not the Ashford Knitters loom (which is their folding model), but I plan to mostly use the loom in the living room so was not concerned with portability.  The stand is sturdy, and you cannot adjust the angle of the loom (though it sits at the same angle as I had set on the one I was borrowing so it works perfectly fine for me).  The mechanics of the ratchet and pawl system work very well on this loom, and all parts are located to the outside, which saves angst on my part.  This loom also has an optional second heddle block (which my BF also got for me)!  I do recommend getting that from this start if you get this loom, as the heddle blocks have to be attached with wood screws and you are probably better adding that item to begin with rather than unscrewing the initial one and attaching the new one later.  In general, I am very happy with many of Ashford's products.  I love my Ashford Traditional spinning wheel, and my first drop spindles were all Ashford.  They seem to have good quality and well thought out functionality across their line of products.

I so excited about my gift and absolutely cannot wait to get it warped with a project! 

Wishing everyone out there a fantastic holiday!  Have a warm, fun and safe New Year!  :-)

Picture
2 Comments

Odds and Ends

12/16/2014

0 Comments

 
This fall seemed to be a series of calamities that has kept me from real progress in some areas (six for over a month, sick cat, BF in an aircast, and recently for me, a car accident), but little things happen that still show progress and give inspiration.

Picture
Lilly is warped with a rug for my Pennsic tent! Yellow rug wool for the warp and the lime is a heavier wool yarn I picked up a year and a half ago at Maryland Sheep and Wool fest.
Picture
My loot from the local fiber arts auction! Some wool cards, new rag and ski shuttles, and a box of wool yarn (mostly Harrisville Shetland).
Picture
And a new-to-me book arrived today! Now I know where the Anne Stine Ingstad article on the Oseberg textiles originated. This has some nice photos from the find :-)
0 Comments

New Book

12/10/2014

0 Comments

 
Picture
I cannot help but get a little excited when I see a really interesting book is due to come out.  Textiles and the Medieval Economy: Production, Trade, and Consumption of Textiles, 8th–16th Centuries is due out next month and it looks like it will be a must have for me! 

http://www.oxbowbooks.com/oxbow/textiles-and-the-medieval-economy.html

Table of Contents:
  • Introduction. Conference: ‘Textiles and economy in the Middle Ages’. Copenhagen, 19–21 April, 2012.  John Styles
  • The missing link. The distribution revolution of the 15th century. Stuart Jenks
  • Hanseatic textile production in 15th century long distance trade.  Angela Ling Huang
  • Textile production, organisation, and theoretical perspectives on trade in the Scandinavian Viking Age.  Eva Andersson Strand
  • Silk trade to Scandinavia in the Viking Age.  Marianne Vedeler
  • Weaving wealth: cloth and trade in Viking Age and medieval Iceland.  Michèle Hayeur Smith
  • The dual crises of the late-medieval Florentine cloth industry, c. 1320–c. 1420.  John Munro
  • Trade with Fustian. Kilian Baur
  • The flax and linen of medieval Novgorod. Heidi M. Sherman
  • Technology and textile production – from the Viking Age and the Middle Ages – Norwegian cases. Ingvild Øye
  • Cloth production and cloth trade in Hanseatic towns with regional and non-regional products reflected in normative and other sources.  Rudolf Holbach
  • Cloth in the large cities of medieval Poland – production and trade.  Jerzy Maik
  • Luxury for everyone? Embroideries on leather shoes and the consumption of silk yarn in 11th–13th century northern Europe. Gitte Hansen
  • Brides, donors, traders: imports into Anglo-Saxon England. Gale R. Owen-Crocker
  • Noble customers of cloth at the Frankfurt fairs around the year 1500. Thomas Ertl and Michael Rothmann
  • Shopping in the early modern North. Shops, shopkeepers and their customers in 16th century Malmoe and Elsinore. Camilla Luise Dahl
0 Comments

Viking Embellishment and Embroidery - Part 3

12/5/2014

7 Comments

 
(The earlier segments of this article can be found here:  http://awanderingelf.weebly.com/blog-my-journey/viking-embellishment-and-embroidery-part-2  and here http://awanderingelf.weebly.com/blog-my-journey/viking-embellishment-and-embroidery-part-1 )

Embroidery, while evidenced, was not common, and often what we have is considered to be imported goods.

First, let me make a comment about how I differentiate types of embroidery that are often discussed among reenactors.  Often I see someone come onto a forum and ask about Viking embroidery.  Others quite often launch into long dissertations about how Vikings did not do embroidery.  What the poster sometimes means, however, is often not figurative, large-scale embroidery, but rather the seam embellishments that are frequently employed by reenactors.  For the purpose of this post I am going to categorize those three types differently as “seam embellishments”, "functional stitches" and “embroidery”.

Seam embellishment, while (in my opinion) over done by reenactors (myself included), is at least plausible and in evidence in several places.  The Hedeby Harbor aprondress fragment had a braid applied over a dart.  There is also mention of embroidery covering a seam in one of the Oseberg scraps and some of the apron dresses from Birka had narrow cording sewn to the top edge of the garment.

Functional stitches, on the other hand, are exactly what they sound like.  They are stitches that serve a purpose (to create a seam or to hold open the seam allowance) but because part of the stitch rests on the surface of the cloth, it can be quite attractive when stitched in a different color of thread. (Even something as simple as unbleached linen thread against a dark blue dyed linen garment can be striking in its simplicity.)

(Note 9/22/15: I was rereading Hilde Thunem's excellent paper on aprondresses and am really thinking hard about a remark the author made "Inga Hägg comments that the hemming stitches would usually be invisible on wool, but would show up clearly on linen. She believes that the reason that the band has been placed lower on the linen smokkr could be to cover the stitches."  I need to go back and look at Hägg's comments and some other things as well.  I want to chart out the extant seams from various finds and see what I can figure out about the visibility of the stitching and the threads used.  It could well be that they Viking era Norse preferred a very clean look, with little in the way at all of stitches showing.)

Ideas for using seam embellishment and functional stitches to create a more accurate impression:
  • Dot not cover every inch of a garment with decorated seams.
  • Fine cord or braided string as an edging has ample evidence (on apron dresses a string, especially if it were linen or silk, at the top might serve a functional purpose in helping the top of the garment to not stretch as much with wear).
  • If the stitch serves a functional purpose, it actually makes more sense in use (example a running or overcast stitch on the surface that actually is part of a hem).  There is one example from the Hedeby Settlement (S 27) that uses buttonhole stitch to join two textiles.  Note though, that that was only one of several types of stitches used on that garment. (S 27 information added 9/30/15)
  • Keep stitches narrow and compact, there is no evidence of an inch wide herringbone stitch anywhere.
  • If you must add stitching, employ stitches that were used in period – examples of some stitches are running stitch, stem stitch, split stitch, herringbone, osenstitch (though most of the the extant examples of this are metalwork).  Note here that while we as reenactors love herringbone, evidence for its use in period is actually quite limited.  It was used on a pouch from York and on the INSIDE of a hem at Hedeby.  A stitch similar to herringbone was used on the Mammen cushion cover (decorative item rather than a garment) and on the collar of the Skjoldehamn tunic (which may or may not even be Viking), but it was not the sprawling herringbone seen in the reenactment community.  For a deeper look at Herringbone see my post HERE.


And now on to the controversial topic of larger, decorative embroidery. 

The examples that we have are often are thought to have been Saxon, Rus or Byzantine imports (the first is thought to be the case with the larger Oseberg pieces in particular).  It is very important to understand that some of these were also considered to likely be from decorative goods, rather than garments.  This proves that the technique of heavily filling an area with stitching existed at the time, it does not at all indicate that this was applied to garments in period.  Also worthy of note is that all of these items were very, very high status.

Mistress Þóra Sharptooth has a good article about extant embroidery here:  http://www.cs.vassar.edu/~capriest/vikembroid.html

Picture
Picture
Embroidery found at Oseberg that is considered to be a Saxon import. (Osebergfunnet, bind iv)
Picture
Valsgärde embroidery, 10th Century. This is worked in metal thread and is thought to have originally been part of an ecclesiastical garment.
Ideas for using embroidery to create a more accurate impression:
  • Use embroidery very, very sparingly.
  • Use appropriate stitches, threads and colors.
  • Only use embroideries for very wealthy personas of high status and use the embroidery only on textiles worthy of that class.  Look for high thread counts and a well-dyed cloth in period appropriate colors.
  • Be conscientious in your chose of patterns and motifs.  Celtic knotwork is always inappropriate for a Viking kit.  Yes, there is fabulous Jelling style knotwork that lends itself well to embroidery, but nothing has been found to support the notion that these motifs were replicated in textiles. 
  • Scale is very important.  Most of the extant pieces are quite small.
  • Consider using embroidery that uses only outline as some of the items from Mammen did. 
  • Or, consider researching Saxon, Rus or Byzantine embroidery, creating a piece and then cutting it down for use on a Viking kit (as if your persona had traded for the item and then re-purposed it as decoration).  Actually, that could be a pretty interesting project, maybe I will try that!


The Argument

Often someone will have their heart set on embroidering a large scale, fantastical beast onto a garment and when looking for advice they are confronted with the facts that this style of decoration seemingly did not exist in our period.  The most common argument I have heard to defend their position is that that people had “all winter trapped indoors to work on these things”. 

Yes, there were long winters, but people were as busy then as they were at other times of the year.  Women were responsible for spinning, weaving and sewing garments for their entire family.  Yes, a wealthy woman might have had slaves or servants to help with these tasks, but that also means that those slaves and servants also needed to be clothed.

Let us look for a moment at the time involved in just these tasks.   In Tools for Textile Production by Eva Andersson, the author comments on experiments in which she took part that showed wool could be spun at 21 yards an hour while the experiments at Ribe show that an average of 61 yards of linen could be spun an hour.  (The difference in the two is that the combing included in the wool time from Andersson’s work, whereas the flax would have already been prepared before the spinning begins).  

If I need 3 yards of 50” wide fabric for a dress (that is roughly what I use for the tunic type gowns I wear under my aprondresses) and I want to craft a textile that is 25 ends per inch for the warp, I need 4200 yards for my warp.  If the weft was slightly thicker yarn (as was often the case) and set at 18 picks per inch, I would need 3478 yards of weft.  That is 7678 yards of yarn for one garment.  Based on the prep/combing/spinning time that Andersson lists you would need 365 hours to accomplish JUST the spinning portion of your garment creation.  If you work on this for ten hours a day, you are looking at over 36 days just spent spinning for a solitary garment.

(And because we are discussing embellishment, which is something reserved for higher classes, here is the calculation for a more finely crafted textile than the modest one mentioned above.  With a warp sett of 50 ends per inch (knowing that this is still not nearly as fine as some of the extant textiles), I would need 8400 yards of warp yarn and another 5799 yards of weft that would be set at 30 threads per inch.  676 hours of spinning.)

Both the experiments at Ribe and Andersson agree that setting up the loom takes 2 days of work (approximately 20 hours of time total).  Weaving was listed as 27-31 inches a day by Andersson.  That 25epi tunic I would make for myself would take me over 3 and a half days to weave if I spend 10 hours a day doing nothing but that. 

The result of all of those figures?  One dress of decent, but not exceptional cloth, takes approximately 43 days of work at 10 hour days.  And this does not include time spent cutting or sewing, this is merely time spent in textile production.  Consider then that I would likely also need a smokkr (aprondress) and possibly a new caftan or mantle.  And do not forget that one would also be crafting garments for a spouse and children. 

I simply find it implausible that there was much time to spare even when "trapped" indoors in the winter.

Assume now that when you are finished with the necessities to cloth your family or fill your house and that you do indeed have extra time.  Would you embellish your attire as befits your station?  Certainly!  I think, however, that would you would choose to add silk strips to your garments (which would provide a costly, but time effective embellishment), or use the thrums from weaving to decorate a seam, or make use of tablet weaving which is a technique that is already considered a status symbol in your community, as is evidenced by the number of wealthy finds that include tablet weaving.  Additionally, it is likely that there is a long tradition of this type of weaving in the Viking areas and this skill been passed down to you by your mother or grandmother.  There is far more logic and evidence to me to support the use of these techniques, rather than the assumption that someone would have chosen to employ elaborate embroidery (which they may indeed never have even seen in their life, which means essentially they would be inventing a new art form...). 

Understand that my goal with this article is not in anyway to stifle an individual’s creative spirit when it comes to embellishing their costume!  I enjoy seeing creative works and often compliment artisans on the skill it took to construct their elaborate garments.  Instead, I am giving my own personal reasoning based on my research as to what I think is realistic in terms of Viking embellishment and why some techniques might have been used more often than others.

And note also that I do not discount that someday we could find that even a farmer's wife did indeed own heavily embroidered clothing.  Personally, I would love to see that, and when it happens, I will happily revise my thoughts on this subject!  :-)


7 Comments

AEthelmearc News!

12/3/2014

0 Comments

 
Ever wish there was a better way to keep up with the local news in our Sylvan Kingdom?  It is now possible with the AEthelmearc Gazette!  There is both a website and a Facebook page and I look forward to following both. :-)  (Click on either image to link!)


Picture
Picture
0 Comments

Viking Embellishment and Embroidery - Part 2

12/2/2014

1 Comment

 
This is the second part of my article on Viking Embellishment and Embroidery.  The first can be found here: http://awanderingelf.weebly.com/a-wandering-elfs-journey/viking-embellishment-and-embroidery-part-1

We know that they used strips of silk to embellish garments.


Like Tablet Weaving, this is a technique that was evidenced at several sites.  The book Silk for the Vikings by Marianne Vedeler covers these bands (as well as other use of silk) in detail.  This method of decoration is exceedingly simple, as well as cost effective.  Grave finds show that imported silken textiles were cut into very narrow strips (often less than half an inch) and sewn to garments as a method of embellishment.

Like the silk threads used in tablet weaving, silk fabric was a sign of affluence.  Even the wealthy, however, chose to cut down these precious textiles to extend their use. 

For those who want to use real silk, but who are on a budget, note that often Etsy or Ebay sellers offer "fat quarters" of Indian silks for very reasonable prices.

Picture
Watercolor painting of one of the Oseberg silk strips as well as a drawing showing what the textile likely looked like as a whole. Artist - Sofie Kraftt. Photo credit - University of Oslo.
Picture
Silk strip from Oseberg, you can see the creases where this was folded and applied to another textile. Photo credit - Osebergfunnet, bind iv.
Picture
Drawing from Inga Hägg's Kvinnodräkten i Birka. Shows the top of a smokkr (aprondress) narrow silk band at the top edge.
Ideas for using silk strips to create a more accurate impression:
  • Keep the strips very narrow.
  • Choose colors available in period with natural dyes (research dyes used in Byzantium or Persia for palette inspiration).
  • Only apply silk bands to garments made from high quality textiles.
  • Silk twills and silk taffettas were both found in graves in Birka and could be reasonable choices for use. 
  • Despite that the weft in some period examples could be of a rough quality, I would not suggest that one use modern silk noil (what we often lable raw silk) for those purpose at all.  Our raw silk is a very different item than the silks used in period for embellishment.
  • If you plan to use a patterned fabric, it might help to research period sources of silk and see what types of patterns were then available.


We know that metal posaments were used.

Metal posaments have been found in graves in Birka.  Some of these are simple knot bands in silver while others were far more intricate. 

More information on posaments (as well as some beautiful reconstructions) can be found here:  http://silberknoten.de/en/index.php?id=2#posamente


Picture
Picture
Posaments from Birka. Photos from Birka III by Agnes Geijer.

More information on posaments (as well as some beautiful reconstructions) can be found here:  http://silberknoten.de/en/index.php?id=2#posamente

Ideas for using posaments to create a more accurate impression:
  • Use this method of decoration sparingly.
  • Best used if your persona is from Birka, as these were not found much outside of that region.


Applique work was very rare and very small.

Oseberg left us a couple of very tiny silk scraps that were once appliqued onto a costume.  There were tiny leaf-like shapes, only a centimeter long, and one small stylized shape of an animal's head.  Both were cut from silk and applied to a garment.  There is no evidence, from any site, of the lovely, large scale applique work you frequently see used by reenactors nor have I seen use of wool applique in period.


Picture
Leaves shaped from silk in Oseberfundet, Volume 4 page 301.
Ideas for using applique to create a more accurate impression:
  • Use applique very sparingly and on a small scale, and would be very stylized.
  • Use silk as your applique material.


Part 3:  http://awanderingelf.weebly.com/blog-my-journey/viking-embellishment-and-embroidery-part-3
1 Comment

    About Me

    I am mother to a billion cats and am on journey to recreate the past via costume, textiles, culture and food.

    A Wandering Elf participates in the Amazon Associates program and a small commission is earned on qualifying purchases. 
    ​

    Archives

    March 2023
    February 2023
    November 2022
    October 2022
    September 2022
    June 2022
    May 2022
    March 2022
    March 2021
    February 2021
    September 2020
    August 2020
    July 2020
    June 2020
    May 2020
    March 2020
    January 2020
    December 2019
    November 2019
    September 2019
    July 2019
    June 2019
    May 2019
    April 2019
    March 2019
    February 2019
    January 2019
    November 2018
    October 2018
    September 2018
    August 2018
    July 2018
    June 2018
    May 2018
    April 2018
    March 2018
    February 2018
    January 2018
    December 2017
    November 2017
    September 2017
    August 2017
    July 2017
    June 2017
    May 2017
    April 2017
    March 2017
    February 2017
    January 2017
    December 2016
    November 2016
    October 2016
    September 2016
    August 2016
    July 2016
    June 2016
    May 2016
    April 2016
    March 2016
    February 2016
    January 2016
    December 2015
    November 2015
    October 2015
    September 2015
    August 2015
    July 2015
    June 2015
    May 2015
    April 2015
    March 2015
    February 2015
    January 2015
    December 2014
    November 2014
    October 2014
    September 2014
    August 2014
    July 2014
    June 2014
    May 2014
    April 2014
    March 2014
    February 2014
    January 2014
    December 2013
    November 2013
    October 2013
    September 2013
    August 2013
    July 2013
    June 2013
    May 2013
    April 2013
    March 2013
    February 2013
    January 2013
    December 2012
    November 2012
    October 2012
    September 2012

    Categories

    All
    12th Night
    14th Century
    AEthelmearc
    Aprondress
    Awards
    Bog Dress
    Bronze Age
    Dance
    Dance Name
    Distaff
    Dyeing
    Embroidery
    Fiber Arts
    Flax Growing
    Food
    Glass
    Haberci
    Headcoverings
    Inspirations
    In The News
    Library
    List Of Links
    Machine Embroidery
    Metal Clay
    Mid Month Inspiration
    Migration Era/Iron Age
    My Documents
    Ottoman
    Ottoman Fabrics
    Pennsic
    Publications
    Research
    Rigid Heddle
    Sca
    SCA Camping
    SCA Forestry
    Sca Name
    Sca Newcomer
    Sewing
    Sheep
    Spinning
    Textile Charts
    Tips
    Totally Not SCA
    Viking
    Viking Bead Research
    Viking Costume: Beyond The Myth
    Viking Swatch Book
    Viking Textiles Looking Deeper
    Weaving
    Wool


      Email Updates

    Subscribe to Newsletter

    Blogroll of SCA & Costume Bloggers

    Below is a collection of some of my favorite places online to look for SCA and historic costuming information.

    More Amie Sparrow - 16th Century German Costuming


    Gianetta Veronese - SCA and Costuming Blog

    Grazia Morgano - 16th Century A&S

    Mistress Sahra -Dress From Medieval Turku 

    Hibernaatiopesäke

    Loose Threads: Cathy's Costume Blog

    Mistress Mathilde Bourrette - By My Measure: 14th and 15th Century Costuming

    More than Cod: Exploring Medieval Norway

    RSS Feed


Proudly powered by Weebly