A Wandering Elf
  • A Wandering Elf
  • Blog: My Journey
  • Iron Age Celtic Studies
  • A Wandering Elf in the Woods
  • Classes
  • Resources: Sheep & Wool
  • Resources: Costume and Textiles
  • Resources: Migration Era
  • Resources: Historic Glass Beads

A Wandering Elf

My original site exploring both Viking Age textiles and clothing and discussing topics relevant to the SCA.

Quick Link to Viking Textiles

Beads... and Symmetry (or lack thereof)

5/22/2023

3 Comments

 
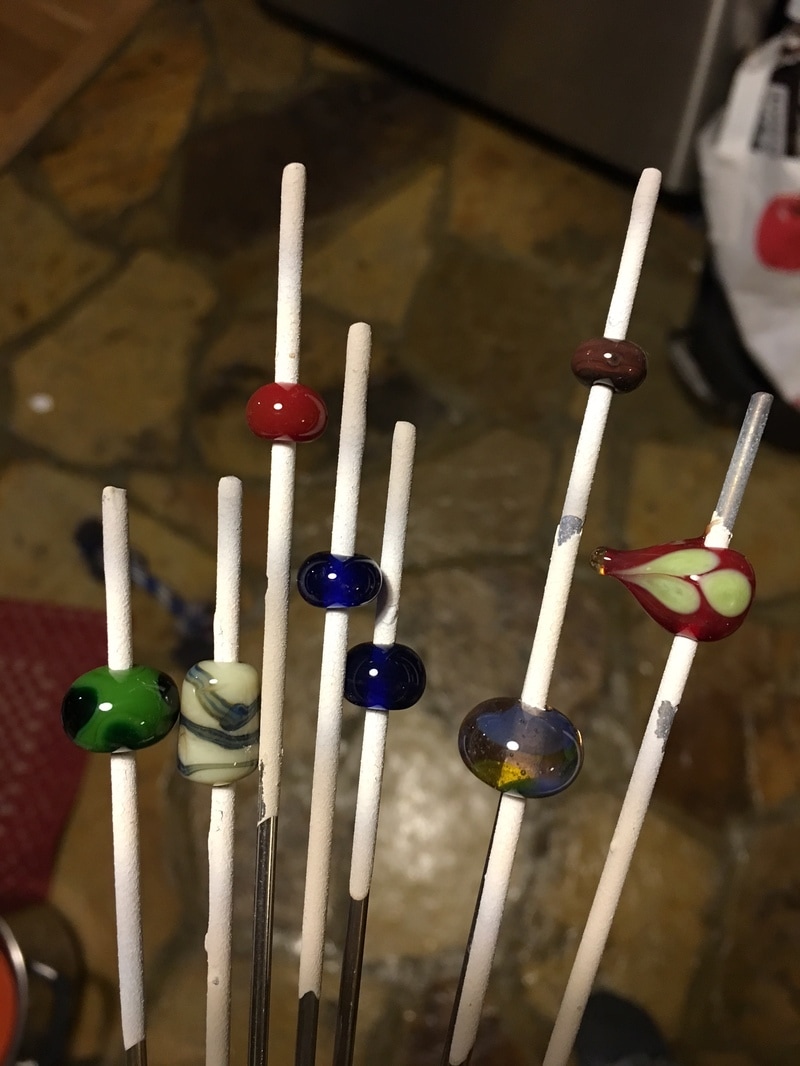
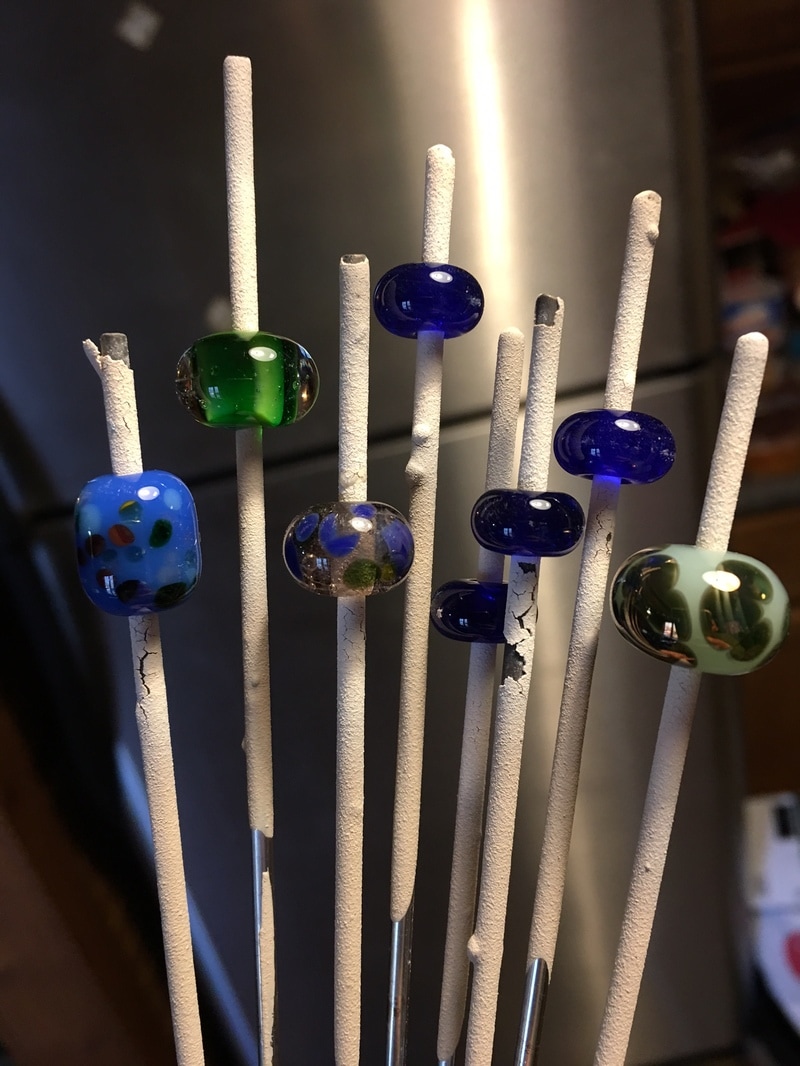
If you are wanting to upgrade parts of your early period kit, I cannot recommend enough that you consider trying something beyond "absolute" symmetry in your strands of beads for certain times and places.  Why?  Because often what we see is not a grouping of beads where the left and right sides of the strand can mirror each other identically.  Frequently the beads in a single find are a scattering of types and styles.

Celtic finds, Migration Period, Viking Age... so many periods were the beads seem to be valued for their uniqueness, rather than "matching" in a mirroring sort of way.  In some collections we see a possibility for balance in the stringing (we often do not know exactly how they were strung during life, and many reconstructions opt for at least balance in the overall look if exact symmetry is not possible), but not that mirroring effect. 

I know that my first Viking strands were always painfully symmetrical, and they never really looked "right" to me.  I was definitely over engineering.  I am happier with the things that I make now, where I let different beads speak to me and get included for what each one brings to my mind.

​Below are some examples of extant groupings of beads that show off balance (with out absolute symmetry) and and some collections that really are a delightfully chaotic mix of things that seem to speak more to me of the people and places from which these items came.

Many museums have beads online and its sometimes worth it to just spend hours surfing until inspiration hits (unimus.no, National Museum of Denmark, Saxon beads are also easy to track down... heck, this is the one time I am actually going to recommend surfing the hated Pinterest for inspiration).

Honestly?  I would LOVE to see more of this type of work, these things that make the piece unique, in the modern world as well.
Picture
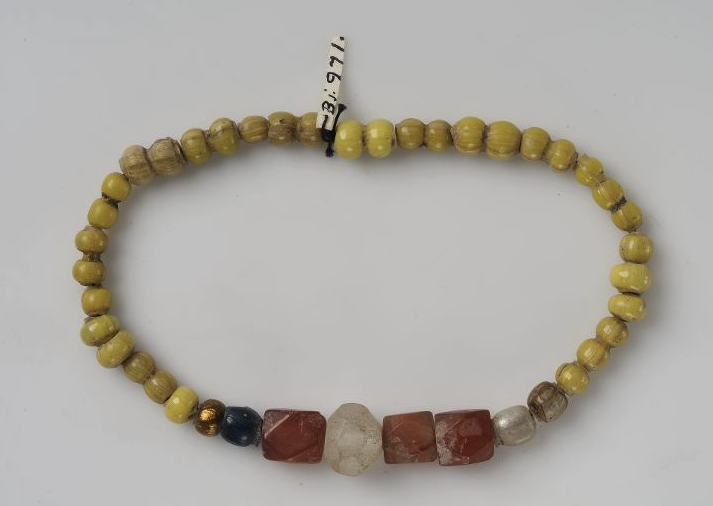
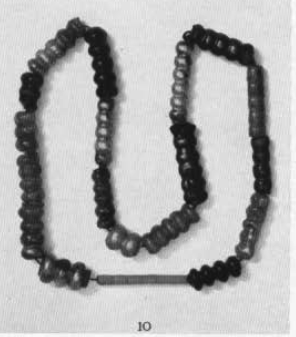
Birka 971... definitely balance was sought after here, but the beads themselves do not show absolute symmetry in size or type from left to right. Also, this one does something else I love, which a large grouping of a single color of bead and a few in the center that really are shown well because of the arrangment.
Picture
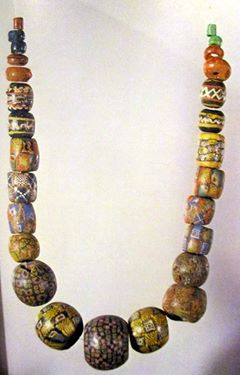
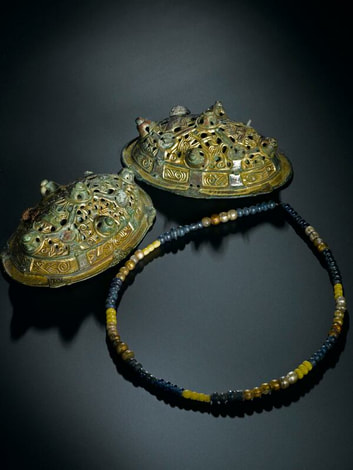
Eidem, Norway. Again, we have attempts at balance in that the largest are in the center and similar shapes go up the sides, but absolute symmetry is lacking. I find that this type of necklace invites me in to a try to learn more about it.
Picture
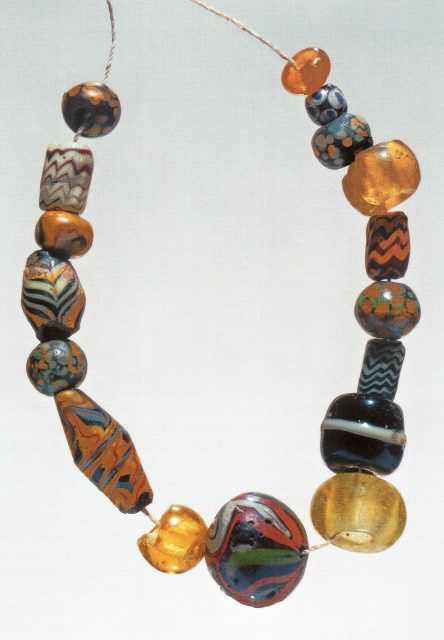
12th Century Novgorod - I love this. LOVE this. This could well have been a valued collection where each piece perhaps represented a milestone or precious gift to the wearer. The is beautiful as it is, even with its colorful chaos.
Picture
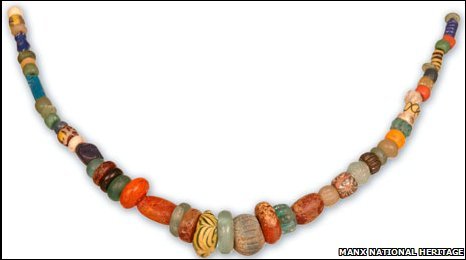
Pagal Lady of Peel necklace - Viking Age. This one is very famous and is absolutely not symmetrical. There is everything to love about it.
Picture
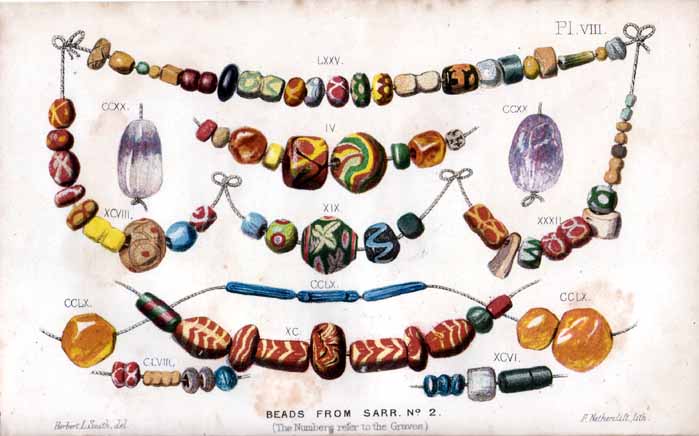
Anglo Saxon beads from Sarre - there is symmetry in terms of shape attempted in some of these, but others are just glorious representations of lives lived. Several have balance in the arrangement, but a couple are just wonderfully random.
Picture
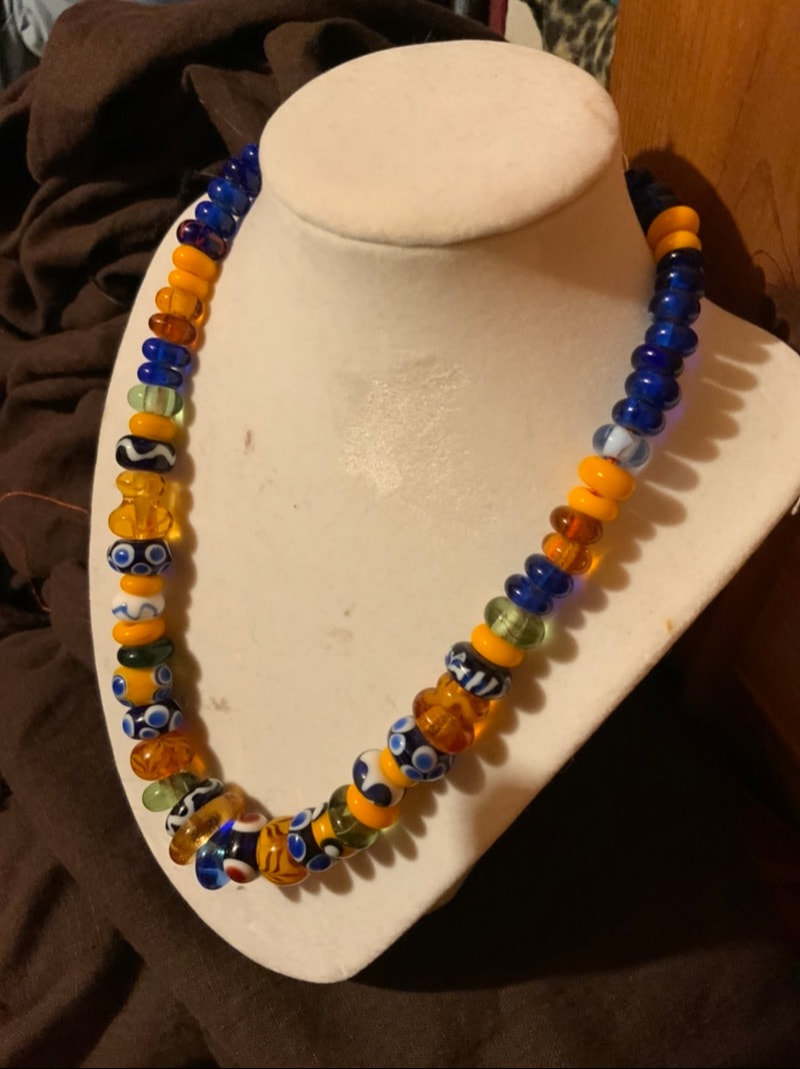
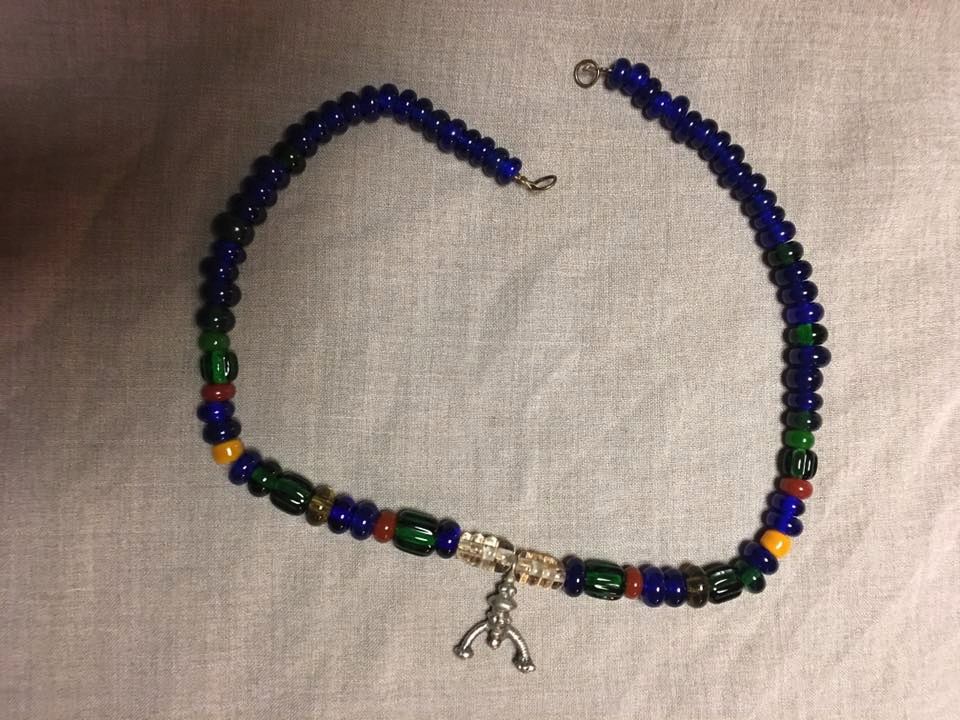
This is a necklace I made for myself that is comprised of early Celtic types of beads. I did not attempt symmetry and honestly, could not love this more than I already do. It is completely unique.
3 Comments

Munsell's Guide

9/24/2020

0 Comments

 
Did you ever have a project that you were SO geeked up about that you were working and working on it and waiting until you were totally finished to share it?  But then, life happens, and it still isn't done?  Well this post is about one of those projects.  I started this a year and a half ago, but it was taking so long I had to stop to do Pennsic prep and then got side tracked with life.  The project recently resurfaced because I had questions about something tangental to it, and so I am going to go ahead and talk about it here.

​Munsell's system for coding colors is a little like Pantone (something with which people are often more familiar, especially given the popular media stir created annually when they announce the Color of the Year).  Munsell's was developed nearly a decade ago to create a guide to help classify soil samples by color.  It takes into account hue (color), chroma (how intense it is) and value (how light or dark the color is).  It is used in a variety of applications, but there are specific field guides that relate to archaeology, including the aforementioned guide for soils, and one for ceramics and one for glass beads.  The last is the one that I find most interesting.

I learned about the guide when I was doing Viking Age bead research and stumbled across Matthew Delveaux's blog https://textandtrowel.wordpress.com/  He has a specific article about Viking Age glass colors (HERE) and wrote a piece housed on the Munsell site (HERE). 

Basically, the Munsell Bead Book contains a set of color chips that you can lay your glass samples next to and compare the colors (it was meant to be used in natural light).

I have already noted the flaws in trying to replicate color based on some Birka samples (post can be found HERE), and that I know that different monitors show color differently (on top of the issues with the actual photography, quality of books, or scans), this system was nothing short of brilliant to me.  Finally, a way to better understand the items I cannot see with my own eyes!


Plus, I could make samples and charts of things!!! (And everyone knows this is really my favorite hobby!). This system immediately had my interest!

I tracked down hard copies of two publications that had articles by Delveaux that labeled beads with the codes from this system, and used Inter Library Loan to get a copy of the bead guide itself (which was so cool I promptly ordered my own).  I decided to make samples of all of my glass, and then apply Munsell codes and then lay them out in a graph that also has points on it for the colors that Delveaux categorized.  So far I have done the warm colors (around 30 samples, though I have obtained a few more since then) and hopefully this winter I will have time to do the cool colors.
Picture
Picture
So this is all super cool, right?  I personally love it, but there are some issues I have discovered:
  • The book is insanely expensive.  It IS available via ILL as I mentioned, but you would need to have all of your samples ready before getting it, I would think.
  • Not everyone uses this system for categorizing colors.  Delveaux did amazing work with the Viking Age beads he worked with (and also, if you want to totally freak out over an incredible data set, check this out.... https://dataverse.harvard.edu/dataset.xhtml?persistentId=doi:10.7910/DVN/RODUZG ). I think his work is the only Viking Age work I have seen.  I have some English beads categorized like this and a few other papers here and there, but I really wish there were more that were relevant to my interests.
  • Vision and color are funny things.  Some people have a very limited range for color vision, while others can determine different colors in a similar set more readily.  Education and understanding of color (which I fortunately have) also helps better interpret results.  I feel it still give a good base starting place for my selecting colors.
  • Certain glass colors can change over time (or being buried in certain conditions), so results can sometimes be off despite best efforts unless there happens to be a more recently broken sample where the inside can be categorized.
  • Glass changes depending on the temperature at which you work it, how long you work it, how it is annealed, etc.  Even buying standard glass colors can have a broad range between batches (the image to the right are all Effetre #444).

Once I do complete this project, I will most definitely be sharing the results here.  But while I am at it, I also want to recommend looking at Moa Råhlander's (Sigrid Beadmaker in the SCA) work, particularly her article Spår av tillverkningsmetoder i glas.  She is a researcher AND beadmaker and kindly shares her comparison to standard Effetre colors for the historic samples!
0 Comments

Metal Magic

1/8/2020

0 Comments

 
Picture
2020 is going to be exciting on the art front for me.  Last spring, I finally purchased a kiln so that I can properly anneal my beads.  I went with the Paragon Caldera kiln (which I purchased through Mountain Glass).  I actually spent about a year pondering which kiln to get.  In the end, I went with the Caldera because I can get additional pieces (such as the bead door or an enameling window), but also because it goes up to 2300F degrees.  Many glass kilns don't go past 1500F, and I wanted to be able to use this for anything, including possibly eventually melting copper or bronze.

Not long after, I made a purchase of Precious Metal Clay (PMC for short, though that is both a brand name, and a generic term for the many metal clays on the market).

Metal Clay has changed my entire art world.  It is magic.  Pure magic!

For those who are unfamiliar with this product, it is a moldable base that is comprised of a an organic material and tiny particles of metal (silver, gold, copper, bronze).  It works as pretty much any clay in that you can manipulate it into a variety of forms, apply textures, use molds to create uniform shapes, even put it on a pottery wheel and throw a cup.  After allowing it to completely dry, it is placed in a kiln and fired.  This process burns out the vegetable binder, and allows the metal particles to fully sinter together leaving you with a solid metal object.

I have how-to books for metal clay.  I have watched dozens of videos.  I still did not fully believe it until I was removing my first silver pieces from the kiln and I accidentally dropped one and it made a distinctive metallic tink-tink-tink as it clattered across the floor.

Pure magic.  And I have to say this has absolutely opened up a whole new artistic field to me and I am loving it!  Below you can see the first two pendants I made from silver (Art Clay was the brand).  (Silver clay is pricey, but it is easier to work with than base metals such as bronze or copper, so it is typically recommended for those starting out.)  After these two items I got overly ambitious and attempted a silver and ruby ring, which crumbled while in the greenware state because I was a bit to aggressive cleaning it up before firing it.  Later I made another silver/ruby ring that fired beautifully, even though the work itself is clumsy and less than aesthetically pleasing.

Picture
Picture
I purchased Prometheus Bronze Clay next.  I used it to do a few test pieces, as I read that getting the correct firing temperature for base metals can be tricky, and had one pretty one that failed to sinter at all, and another that worked well and is most definitely solid metal.
Picture
The bronze clay test piece (that was doomed to fail) before going into the kiln.
Picture
Yup, total fail.
Picture
The one that lived. I got this one to sinter well. It is strong and solid, though not fully polished in this photo.
Picture
After getting a bronze item to work, I set out to make a set of Saxon annular brooches for Pennsic.  Yes, yes, I know that is not how they were made in period, but things like this allow me to refine and art while also affordably adding necessary items to a kit for a complete picture.  I consider this to be the metal working equivalent of machine sewing something.  It will also definitely not replace expertly crafted items for reenactment items in which I have a deep research/time investment.  Things like my good Viking items will always come from those artisans who have honed their skills and who are producing quality period reconstructions.

I did have one brooch fail to sinter (I fired them separately just in case), but it was easy to make a replacement.  I tried to roll out clay to make a pin, but also had issues with that so I purchased bronze wire and hammered and sanded and heated and drove myself nuts, but eventually successfully made the pins for them.  (Metal work is completely foreign to me, so I was unaware that bronze is such a pain to deal with or I might just have used copper instead.)

Last month I finally had some more time and I prepared a Saxon girdle hanger as well.  The pieces have not yet been fired though, as I accidentally broke one while sanding them down in the greenware (dry, but unfired) state.  I have made a repair and should fire them in a couple of weeks.
​

And then I decided to try out Cyprus Copper clay on some modern items that I could use to develop better skills in working with this clay.  I am having an incredible time dreaming up pieces of jewelry and then seeing if I can shape them from magic clay.  

Below you can see the three pieces I am quite pleased with.  All three came out pretty much as I envisioned, and the setting for the sapphire in the top one is much cleaner than the ruby I tried this summer.  These pieces have all over-fired though, and you can see the bubbles in the large annulet on the right side (all of these pieces have the bubbles on the back side).  I am now running test pieces to properly dial in the temperature.
Picture
Picture
Picture
I also got exceedingly ambitious over the holidays and attempted to hand sculpt woody nightshade flowers into a pendant.  I added a bail after taking this photo, but the piece was drying last weekend, so I have not had time to look at the back and check for cracks.  I don't know that this has any chance at firing properly, but at the moment, at least, I am very pleased with the results.  

My mother got me a tumbler for Christmas, so I no longer need to hand polish pieces after firing.  I can drop them in the barrel and come back half an hour later to collect my shiny metal items.

Picture
And there is more!  I also dabbled in a bit with glass frit fusing towards the end of the year.  I mean, I have a kiln, so why not do all the things!  I made glass tree ornaments, and got a mold to make some garden things.  It was fun, but not addictive for me in the way that the clay is.

And speaking of glass, my amazing boyfriend has purchased an oxygen concentrator for me!  That means I will be stepping away from a hothead torch soon, and stepping up to duel fuel and some serious melting potential.

I hope that 2020 is full of amazing explorations of art!

0 Comments

Glass: Starting out - Glass & Suppliers

4/23/2019

1 Comment

 
Last month I talked about basic supplies you need to get started working with glass.  (The post can be found here .) I mentioned that I would also share my preferences for the glass itself soon, so here is my opinion filled post on the topic!

When starting out with making beads, most people use what is called "soft glass".  This category includes soda-lime glass (the most common) and also lead glass.  "Hard glass" is borosilicate glass (Pyrex glass used to be made from borosilicate).  Soft glass melts at lower temperatures, making it ideal for those working on a hothead torch (it is also less costly than boro).

When looking at glass suppliers, you will see glass within the Soft Glass category is often noted with a COE number.  COE stands for Coefficient of Expansion, is a way of noting how something changes in size with a change of temperature.  This is important because you need to make sure that the glasses you are using together will be compatible and the first thing to check is that the COE matches (note, COE alone does not promise that your glass will play well together, some colors just don't want to be friends with others and there is still going to be trial and error involved and it will definitely help to chat with more experienced lampworkers when issues arise).  The higher the COE, the "softer" the glass is.

I pretty much only use 104 COE.  There are several manufacturers and a very wide range of colors in this category.  I do have some 96 COE frit (crushed glass that is used to decorate glass goods) because in small doses it will work with 104, and I bought a few rods of Bullseye (90 COE) because they had colors I needed to test out.  I am being careful to keep those rods of glass away from my batches of 104 because mixing the two will most likely result in cracked beads.

With all of that in mind, here are some of the major brands of glass:

Effetre (Moretti): This Italian glass has been around since the Renaissance.  I would say 75% of my glass stash at this time is Effetre.  It melts easily on my torch, comes in a wealth of colors, and many shops have regular sales on this one which lets me keep my favorite colors in stock.  They have all of the basic colors needed for historic beads as well.  My favorite vendors for this brand are Mountain Glass, Howaco, Wale Apparatus, and Frantz.  

A couple of personal opinions I want to note here about Effetre (your experiences might well differ, and I encourage you to play around as much as possible, with as many colors and brands as possible):
  • The white is a clean clear white, even if heated a lot.  (Devardi's white smudges up and looks dirty very easily.)
  • If you are buying clear for encasing, pay the little bit extra and just go with the Super Clear.  It goes on more smoothly and is less prone to looking dirty when over worked.
  • My Go-To colors are:  Super Clear, White, Black, Cobalt transparent, Pea Green Opaque, Grass Green Transparents, Lapis Opaques, Ivory, Lemon Yellows 
  • Keep in mind that Black glass is technically a transparent, so you will not find that if you have a filter set to show you only opaque colors.
  • Intense Black is a very, very pricey black that can do some very cool webbing effects on certain colors.  I would not choose this one for working basic black beads just due to the price (and for the chance that it will web).
  • Teals, some greens and some blues have copper in their chemistry.  These can very easily reduce on hothead torch and you will get opaque red-brown patches in the glass. Be careful to work these gently and far out in the flame (and do not over work).  The cobalt/lapis range of blues and the Grass Green transparents are more forgiving.
  • Turquoise and teal glasses can have beautiful effects when used in conjunction with ivory.
  • If you are looking for reds/browns/yellows and cannot find them under Effetre Pastels (pastel = opaque), that is because they are often listed as "special" colors.
  • Many of the reds will darken the more you work them, and even if they are careful, they can still get darker when they are annealed.  Do tests with this color so that you know what you are likely to get in the end.

CIM (Creation is Messy/Messy Glass): CIM glass is made in China and it comes in a pretty wild array of colors.  Many of their glasses are translucent or opal, rather than transparent or opaque.  Often a rod will yield a bead that has striations of light or darker glass, or that will strike to a slightly different shade than the rod itself.  Many of my favorite colors from this manufacturer are less useful for historic reproductions, but still can make incredibly beautiful jewelry.  My favorite vendors for this brand are Mountain Glass and Howaco.  
  • This glass can be a bit more fussy than Devardi and Effetre, and I am glad not that I did not immediately jump in to try it as I could well have found the experience frustrating.
  • ​I absolutely love their range of reds and am particularly fond of Hemoglobin and Sangre.
  • I also love their opal, chartreuse greens such as Elixir, Budgerigar, Ectoplasm and Anole.  Note that these can be very easily overworked.
  • I still have many colors of this brand to sample, but over all, I prefer the more "solid" colors of Effetre for historical applications.

Devardi: I started with Devardi glass, which is produced in India, and still love many of the colors.  This is still a "soft" glass, but it tends to be quite stiff compared to some of the others in the 104 category.  I actually found this very useful as a beginner because I had time to work the glass without it getting too goopy and dripping right off the mandrel (something that totally happened to me the first time I tried Efftre on a duel fuel torch, lol).  The other benefit to this one is that it is very cheap, especially when you buy in bulk.  I really do recommend buying one of their bulk lots of random glass and just enjoy playing with when you start out.
  • It is definitely worth getting one of their bargain bundles of glass when you are starting out.  
  • I still love their cobalt blue in particular.  It is very stiff and makes for great sculptural items.
  • I also still use their amber transparents and the yellow-green transparents frequently.
  • Forest Green burns easily, or will get red reduction spots in very short time.
  • I do not like their white or clear, and prefer the Effetre in those.

Double Helix:  Once you start working with glass you will see this name come up frequently or you will see lampworkers posting their beads with wild iridescent effects.  This company makes a range of silver glasses (these are the ones that will have iridescent, pearl or color changing effects) as well as superb clears.  These glasses are very pricey, and many of them will not work well (or at all) on a hothead torch.  If you want to test the waters, I recommend getting one of their reduction frits to play with first to start learning how to bring out the wonderful metallic effects of their glasses.  And if you enjoy encasing, their clears can be life changing (and yes, buy the "seconds" as they are cheaper and wonderful to work with).


A few other random bits of information:
  • Glass color can vary from batch to batch, so do not be surprised if you get a redder red or a lighter blue when making a repeat purchase of a color.
  • Most of the glass supply companies have regular sales!  I HIGHLY encourage you to sign up for their newsletters so that you can plan your purchases around the better sales.  
  • Turquoise glass, in every brand I have tried, hates to be encased.  (I always end up with cracked beads. lol)
  • Brilliant pinks and purples are going to be the most pricey glasses out there.  Definitely look for sales on these items.  You can also use tricks like making a base bead in white (or another color) and encasing it with your pricey glass to use as little of it as possible.
  • If you need a certain color and your favorite vendor is out, I recommend browsing the selection at other sites because occasional someone will even still have out-of-production colors!
  • There are other brands of glass beyond those I have listed above.  I have not had enough experience with them to yet form an opinion but I highly recommend that you get samples of anything that interests you and test them out!

As far as vendors go, Mountain Glass is by far my favorite.  The guys there are fantastic at helping you find what you need and letting you know immediately if something is out of stock.  They also ship very, very quickly.  They have soft glass sales every month, as well as a weekly special.  They are located in North Carolina, but are preparing to open a West Coast facility this year as well. If you are looking to upgrade a kiln or torch, I very much recommend talking to them, because they will be more than happy to help you figure out what you need (without trying to sell something you don't need).  I happily give them my business whenever possible.  

Howaco has the best non-sale prices on Effetre that I have found anywhere.  Her prices are extremely good at all times.  Another bonus of this vendor is that you can buy a single rod of glass so that you can test a color before ordering more.  Note that this is a smaller shop, so that it can take a little more time for her to process and ship your order (especially if you are ordering a ton of single rods, as each has to be labeled before being packaged up).

Devardi is my staple for inexpensive tools and certain colors of glass (as well as bundles of cheap glass for dabbling).  They also have excellent customer service and very quick shipping.


1 Comment

Glass: Starting Out

3/21/2019

13 Comments

 
Having only been working with glass for a few years, I am by no means and expert, but given that several folks have asked me what I would recommend they get to start, I figured I have enough experience at least to share what is working for me, and I what I consider my personal necessities.

I started out with a ton of things, including many that I did not even know how to use.  It was amazing to have all the tools at my disposal from the start, thanks to a wonderful Christmas gift from my boyfriend.  He had basically bought me a whole studio kit from Devardi and I could just dive right in.  Not everyone can or wants to jump in that hard from the start, so I am going to let folks know what I use the most from my initial set up as well as the other things I have added on my journey.

One quick note about vendors before I go further.  I use three main suppliers for my glass and tools.  My favorite by far is Mountain Glass.  The folks there are super nice and very helpful when it comes to helping you decide what it is you need.  Their customer support is fantastic. They also ship very quickly, and while I have not yet done it myself, I understand that they also price match their competitors.  I recommend signing up for their weekly emails as they always have great sales going.  Plus sometimes they send you get cool weird things like posters, stickers or even a music CD in your packages.  ;-)  

​Another supplier I use is Howaco Glass.  This vendor has low prices on soft glass, and carries the major brands I love.  She also allows you to purchase a single rod of a color.  This is WONDERFUL for when you just want to test something out.  Shipping is not super quick, but I have never had an issue with my orders and I love the prices and convenience of buying just a single rod.

​Finally, I want to talk about Devardi.  Sometimes if you mention that name on some of the glass forums, you will get some pretty harsh reactions.  People either love or hate these products.  Personally, I think their kits for starting out are pretty fantastic for those who want to jump right in with all the tools at a good price.  Their marvers and mandrels are good quality and the price is fantastic.  Their glass is usually the big point of contention with folks.  It is "stiffer" than other "soft" glasses.  This means it can sometimes take a little longer to melt and work. Personally, I was GLAD to have that extra time when I was just starting out.  It saved me a lot of dripping drooping glass.  There are some professional artisans that prefer this glass for certain things because the stiffness allows for some pretty cool sculptural work as well.  I absolutely LOVE some of their colors (cobalt blue transparent, for example), and I have found others just are not to my taste (I find their clear clouds up and gets muddy with a hothead, and also is too stiff for encasing).  My recommendation regarding glass is to learn the basics and then sample everything out there (all brands) and find what suits your style and budget.  You cannot bead the price for bundles of Devardi glass to just get your feet wet and learn how to make beads.

Safety

I guess I should mention this sooner rather than later.  Be careful.  Read everything you can find on working glass and the safety precautions you should take.  Note that large propane tanks need to have long hoses so that they can be stashed outside while you work.  Make sure you are torching over a non-flammable surface (an aluminum sheet on your work station will suffice), make sure your torch is not too close to the wall.  Eye protection made for glassworkers is important (there are different grades protection depending on what type of glass you are working, look for didydium safety glasses).  And proper ventilation IS A MUST.  I work in a drafty garage, have open doors and windows near me, and only work for a short span of time at once.  As I am working longer stretches, I am now in the process of building a proper ventilation system (fans, ductwork, etc).  Note that the issues with ventilation are not really over the fumes from your fuel, but rather it is to remove the gasses from the melting glass (which can contain metals) from your air.  This is very important.  Please read up on ventilation for glass work.  A start on safety can be found here.

Torch

PictureDevardi propane torch with bracket
My torch is a simple, single fuel torch from Devardi.  It is essentially their version of a Hothead torch that is used by glassworkers all over the world.  Note that this is different than the torches you buy at the hardware store, so I do NOT recommend getting one of those to start.  The Devardi version of the Hothead is very inexpensive and you can get a brand name Hothead from Mountain Glass or other vendors.  I use my torch with camping canisters of propane.  Some others prefer to use Map-Pro or other cutting fuels.  I will also soon be switching my set up to using large tanks of propane rather than the 1lb tanks now that I am making more beads in a sitting, I don't want to have to change a tank out as often.  Note that you will also need some sort of bracket with which to mount the torch to your work surface.  I use the one shown at the right.

Other torches need two fuels to work, usually propane or something similar, and oxygen.  These torches start at a couple hundred dollars and run into the thousands.  You also need a source of oxygen, either tanked oxygen (not legal everywhere), or an oxygen concentrator (which can be quite pricey, even for a refurbished one).  I took a class once and it used a duel fuel torch and I made a hot mess of the glass straight off because the extra heat from the torch, plus a softer glass than I was used to, it just melted and dripped onto the table.  I am more experienced now, am used to the softer glass, and itching to work faster, so at some point I might add this type of set up to my studio space (though I will not forsake my hothead).  

Cooling

After you create your beads you will need some method of slowing the cooling process of the beads.  If they cool too quickly they will experience thermal shock and crack.  There are a number of ways to do this.  I personally use a fiber blanket.  After a great deal of use, they can start to shred, but my first one has lasted me over two years and I just recently bought a replacement for it.  

Because I often work in a very cold garage, I added an extra measure of insulation by building a little box/frame for my fibre blanket out of foil insulation (shown to the left) and duct tape.  I think this helps hold the heat a little better.

Other options for cooling are to use a container full of vermiculite or annealing bubbles.  When your bead is done, and no longer glowing (you can check this by holding it briefly under your table where it is darker), you can plunge the mandrel into the pot.  The vermiculite or bubbles will allow it to cool off more slowly and prevent cracking.  Some people even go to goodwill and buy an old crock pot and put the vermiculite/bubbles in that and turn it on to help retain more heat.

Annealing

Note that cooling and annealing are two different things.  Beads MUST be annealed before using them, and they absolutely must (this is not even remotely optional) be properly annealed before selling them.  For annealing you really need a kiln of some sort.  There are many varieties on the market, and occasionally you might find one on craigslist.  They come in digital and analog versions, and a variety of sizes and have a range of temperatures depending on the type of work you will use them for.  I personally have used a Paragon Bluebird, and hope to eventually purchase a Paragon Caldera with a Bead Collar.  I am opting for a smaller kiln, that can fire at a higher temperature as I also plan to use it for Precious Metal Clay work and for melting metals for casting.  When it comes time to purchase a kiln, I highly recommend you talk to experts like the guys at Mountain Glass.

Devardi also sells a Mini Annealer.  Again, this item is a huge point of contention amongst long time glassworkers, as to whether it truly anneals or not.  I have been using one for two years, and my beads take some pretty hefty abuse and they are holding up, but I am waiting to get the Caldera before I start selling any of my work.  I am very happy with this little device and love that it has enabled me to really get use out of my creations thus far.  The annealer can also be used as a rod warmer (which is something I will discuss a bit further down).

Mandrels and Bead Release

These are two items you absolutely must have to make beads.  The mandrels are the metal wires on which you form the beads.  The bead release is a runny goop you apply to the mandrels that will prevent the beads from sticking to the steel.

For mandrels, I buy mine from both Devardi and Mountain Glass.  Devardi is a little cheaper but you need to take a bit of sand paper to the ends to smooth them, Mountain Glass has that already done.  There are many sizes of mandrels, and my preferences are for the 3/32" (2.4mm) and the 1/8" (3.2mm) sizes.  I have smaller and larger ones, but these are absolutely the ones I use the most.

Note that when you get new mandrels, you will need to wash them off and hold the ends over your torch flame to make sure that no oils are on them, as that can prevent the bead release from holding properly, causing it to flake off into your glass or possibly causing the bead to permanently adhere to the metal.

As for bead release, I started with the Devardi release that came with my kit and then bought two more bottles of it after that.  It works decently, but can be a bit of a pain to clean out of the beads later.  I tried Dip-n-Go Sludge Ultra on a whim when it was on sale at one point and I, honestly, can say it is life changing.  I love this stuff.  I have not ever had it flake, I have not had a stuck bead since using it, and it cleans out of the holes very easily. This is now my go-to bead release.

And yes, you do need to clean the beads later.  Some people use a dremel or other fancy tools, I just have the simple set listed on the right and a stiff pipe cleaner and it does the trick for me.

Other Tools

There are literally hundreds of tools you can use to shape your glass.  They come in a range of qualities, prices and styles.  I personally love the many graphite marvers that came with my initial set up and some of these are still in my most-used tools.

A handheld marver is a must for me.  Mine is an aluminum one from Devardi, but they also come in graphite.  You will hold a tool like this in one hand while you roll the bead across the surface to smooth or flatten it.

Other marvers have shaped surfaces that allow you to consistently make beads of a certain size or shape.  I have a dozen of these and my favorites can be seen below.  You do not need these to start out, as a simple marver paddle and gravity can make beads of many shapes and sizes, the shaped marvers just allow you to do it a bit quicker and more consistently.
Picture
Graphite Marver from Devardi
Picture
8 Slot Donut Marver from Devardi
Picture
Round Bead Shaper from Devardi
Aside from marvers, you will need some sort of poking tool.  I prefer the tungsten probe from Mountain Glass.  I actually have a couple of sizes, but the one linked here is the one I most commonly reach for.  Some sort of rake is also needed to drag designs or dots on your glass.  Stainless steel dental picks work great as do the steel tools in wax carving sets (which can be obtained cheaply).  Along with a pick or rake, you will find dozens of uses for an inexpensive set of long steel tweezers.  You can use them to pick bubbles or flakes of bead release from a bead, manipulate the hot glass, apply murrini, and other things.  

One other tool that I absolutely cannot live without is an antique brass knife.  Stahl knives are wonderful for working glass.  Aside from my marving paddle this is the item I reach for the most.  You can find them on ebay and sometimes on Lampwork destashing forums.  I only paid $15 for mine and it is very much worth it.  Many of them are quite decorative with horn or ceramic handles.  I cannot recommend owning one enough.  Hot glass does not like to stick to brass, so you can use this tool to press designs into your work, mash small areas flat, spread encasing glass... the list goes on.
Picture
The edge of my brass knife
Picture
A melon bead shaped with the flat edge of the knife
The above items the start of my list of basics.  My next post will discuss the glass itself!!!

​A Wandering Elf participates in the Amazon Associates program and a small commission is earned on qualifying purchases.
13 Comments

Viking Bead Research: Kneep

1/18/2019

2 Comments

 
​Location: Scotland - Kneep, Uig, Isle of Lewis
Date: 900-1000AD
Type of Find: Burial
Date of Excavation: 1979
Context: Beads were found in neck area, oval brooches (P51) were present
Beads: 44 glass beads (39 segmented, five unsegmented), yellow, blue, silver, gold.  Length varies between 9 - 13 mm.
Picture
Picture
Picture
Brooches and beads from Kneep, photo credit to the National Museum of Scotland
PictureSegmented beads from Kaupang, you can clearly see the severed (rather than flameworked) edges.
​This excavation was begun by civil authorities (not archaeologists) as a bone was protruding from the sand in a public area.  There was, however, a great bit of detail involved, and between the information presented and later interviews, there was enough to logically reconstruct the burial.
 
One of the things that fascinates me with this particular find is that all of the beads are of the same type.  They have one to four segments, and have a simple color palette.  We do not know the original arrangement, unfortunately, but know that these items at least were worn together.  One other interesting item is that this paper notes that the beads were produced in long lengths and beads were snapped off as needed along the segmentations.  Based on the text, the metal glass beads are of two types, with one just having a metal coating on the glass and the other having a layer of clear glass encasing the metal.  The description of the process in this paper is a clunky, to say the least, but might be due to the lack of glass workers as part of the process (there is more in the way of experimental archaeology in that field now).
 
Personally, I have to wonder if it is truly gold encased the beads or if the glass merely had a reaction when laid over the silver that alters the color to gold (or perhaps it was amber colored glass laid over silver).  Even glass that has silver added to it (something done with spectacular modern color-shifting glasses), can produce fuming that will alter the color of adjacent glasses. 
 
In his blog entry, “Kaupang before the Coin”, Matthew Delvaux discusses the idea that the segmented beads were imported goods from the Middle East and proposes the idea that they possibly were a form of currency in the early Viking Age.
 

​As an aside, I need to note that I will probably be talking a great deal here about segmented beads as this particular item is found all over the Viking world.
 
This necklace is very simple, and when all strung together the necklace is 465mm long.  That length would make for a long swag between brooches, and the authors of the paper suggest possibly it was multiple strands.  It is also long enough to serve as a standard necklace as well. 
 
While reading about the Kneep necklace, I remembered a similar strand of beads from Birka and had to go back to look at that material to assuage my curiosity.  In Birka I, there is an image of a strand primarily comprised of segmented beads.  The caption for the photo has it listed as Grave 958.  However (and here goes some of my issues with the Birka material that I previously have mentioned), the descriptive text for that volume shows 958 as a male grave with a purse.  Grave 959 from that book seems to better fit the image attributed in the plates as 958.  
​
​The text describes the beads as being one carnelian, 5 dark blue made of glass (one triple segment, 4 double segment), 4 green glass beads (one 4 segments, one triple), 7 yellow glass beads (one triple segment, five double segment, one single).  These beads were found in conjunction with a pair of oval brooches (and the woman was decapitated, making for a rather gruesome interment).

My take on these finds is that sometimes smaller, and simpler, can be perfectly appropriate for a period impression.  Hopefully I can experiment further with crafting segmented beads myself!
Picture
Beads from Birka 959
Picture
Stolpe's drawing of Grave 959
Resources:
 
Arbman, Holger.  Birka I: Die Gräber, Tafeln, 1940.
 
Arbman, Holger.  Birka I: Die Gräber, Text, 1940.
 
Delvaux, Matthew.  “Kaupang before the Coin”, Text and Trowel, 2017.  https://textandtrowel.wordpress.com/2017/05/11/kaupang-before-the-coin/
 
Welander, R. D. E., et. al.  “A Viking Burial from Kneep, Uig, Isle of Lewis”, Proceedings of the Scoiety of Antiquaries of Scotland, Volume 117, 1987.
https://archaeologydataservice.ac.uk/archiveDS/archiveDownload?t=arch-352-1/dissemination/pdf/vol_117/117_149_174.pdf
 
National Museum of Scotland: https://www.nms.ac.uk/explore-our-collections/collection-search-results/?item_id=369355
 
Unimus.no Fotoportal: http://www.unimus.no/foto/imageviewer.html#/?id=12462897&type=jpeg
2 Comments

New Year, New Projects, New Research

1/3/2019

0 Comments

 
Picture
2018 was pretty much a crappy year.  I was ready for it to be totally over by the time March rolled around, and it only got worse from there.  Family health issues were surreal (to put it mildly), and the punches just kept on coming.  And then there are the cat issues (one diagnosed with stage 3 kidney disease, another with lymphoma and a third had knee surgery.  Add to all of that the incessant rain, and things just were a jumbled mess.

One of the few good things was getting Malik, our new F1 Savannah boy.  He is exceptionally social and is my constant shadow when I am home.  A new travel trailer also meant a few short trips to test things out (and to take the Savannah's camping).  That bit, at least, was good.

I put together a new class for Pennsic that covers a more basic approach to a Viking Age Norse woman's wardrobe than my Textiles and Dress class covers.  It seemed to go over well and I plan to teach it again.  That class also ended up leaving me with a ton of questions regarding our perception of Viking Age beads (and specifically brooch swag and necklaces) and down the research rabbit hole I went.

I also got back to the garage and got my glass studio cleaned up and I am now working like mad out there ever weekend.  Glass is unlike any other artistic material I have ever used.  When working with paints, the results for color are predictable (red and blue make purple).  That is not always the case with glass, as the chemical compounds that provide the coloration can produce interesting results, as can the amount of heat you use, the time it is heated, how much propane is in the flame, and a dozen other factors.  Heck, even the rod of glass can change color when inserted into the flame (or again when it is annealed).  It all makes for some pretty fantastic experiments (which is something I love doing anyways). 

So I am steadily working to improve my technique in making beads, with two goals in mind.  The first is to be better able to reproduce period bead types, and the second is for some more mundane artistic exploration with glass.  I am completely in love with this art (and have not yet set the garage on fire)!

Along with this hands-on practice, I am trying to read and take notes on my stash of period glass literature.  I have so many questions surrounding frequency of beads in graves (in relation to other aspects of the graves) that I hope to answer and compile into something useful.

Below are a few images of my revised studio set up, as well as some of my (non-period) experiments with glass.  Many of them are just my testing colors of glass that I have, and others are exploring techniques.  

Picture
Picture
Picture
Picture
Picture
Picture
Picture
0 Comments

Glass - Finished

5/16/2017

0 Comments

 
I was beyond thrilled when I pulled the last batch of beads from the annealer Friday and discovered that I indeed had enough to make a necklace that I could wear to Crown.
​
Picture
0 Comments

Oh yes, more glass

3/17/2017

1 Comment

 
I almost wonder if I shouldn't start a second blog for my glass experiments as I know folks tend to wander to this spot for textiles and costume.  lol . But for the moment, here is my weekend's work (which was violently interrupted sunday by a terrible plague).
Picture
More small beads with some of the new Devardi glass I ordered. They now have some colors in 5-6mm rods and they are wonderful to work with! The red bead on the right also had me playing with shaping.
Picture
More little beads as well as playing with some layers of transparencies and reducing glass (far right).
Picture
I have to experience things to really "get" them. I got some reducing frit and learned how to cover the holes in my hot head torch to bring the metal out in the glass. It was SO cool to see how this worked!
Picture
Here is an attempt at a pendant (right), it even has a bail built in. On the left is a very clunky little vessel. What you cant tell from the pic is that I actually blew the bottom out further (on a hollow vessel mandrel). I cant wait to try this again with more glass!
1 Comment

Still learning! 

3/6/2017

0 Comments

 
Once again I played with glass this weekend.  I know folks have to be getting bored of these posts, but I am using this to track my own progress.  Hopefully for your sakes I will lose interest in these updates soon! ;-)    
Picture
I made a few more simple beads for my Viking strand and then played with encasing. The striped one did not have enough clear to drag the design further towards the mandrel, but I love the idea of this. The large one is a clear base with frit, then more clear and more frit. It has depth to it in bright light, but cracked while cooling.
Picture
I FINALLY pulled a usable stringer! This was striped clear and opaque and, as you can see from my spirals, I cant control it well, but I love the options this will give me. The small red one is also layers of clear and frit and the ring... I just had to try it. It is really wonky in shape but it worked. I cannot wait to do more. This is based on an extant Roman glass ring in the Met which I will post further down.
Picture
Two more decent small beads and a larger one with dots that I actually got evenly spaced and then drug out to a point.
Picture
The ring!
Picture
Extant ring from the Met. http://www.metmuseum.org/art/collection/search/249583?sortBy=Relevance&ao=on&ft=glass+bead&offset=320&rpp=20&pos=322
0 Comments
<<Previous

    About Me

    I am mother to a billion cats and am on journey to recreate the past via costume, textiles, culture and food.

    A Wandering Elf participates in the Amazon Associates program and a small commission is earned on qualifying purchases. 
    ​

    Archives

    July 2024
    January 2024
    October 2023
    September 2023
    August 2023
    July 2023
    May 2023
    March 2023
    February 2023
    November 2022
    October 2022
    September 2022
    June 2022
    May 2022
    March 2022
    March 2021
    February 2021
    September 2020
    August 2020
    July 2020
    June 2020
    May 2020
    March 2020
    January 2020
    December 2019
    November 2019
    September 2019
    July 2019
    June 2019
    May 2019
    April 2019
    March 2019
    February 2019
    January 2019
    November 2018
    October 2018
    September 2018
    August 2018
    July 2018
    June 2018
    May 2018
    April 2018
    March 2018
    February 2018
    January 2018
    December 2017
    November 2017
    September 2017
    August 2017
    July 2017
    June 2017
    May 2017
    April 2017
    March 2017
    February 2017
    January 2017
    December 2016
    November 2016
    October 2016
    September 2016
    August 2016
    July 2016
    June 2016
    May 2016
    April 2016
    March 2016
    February 2016
    January 2016
    December 2015
    November 2015
    October 2015
    September 2015
    August 2015
    July 2015
    June 2015
    May 2015
    April 2015
    March 2015
    February 2015
    January 2015
    December 2014
    November 2014
    October 2014
    September 2014
    August 2014
    July 2014
    June 2014
    May 2014
    April 2014
    March 2014
    February 2014
    January 2014
    December 2013
    November 2013
    October 2013
    September 2013
    August 2013
    July 2013
    June 2013
    May 2013
    April 2013
    March 2013
    February 2013
    January 2013
    December 2012
    November 2012
    October 2012
    September 2012

    Categories

    All
    12th Night
    14th Century
    AEthelmearc
    Aprondress
    Awards
    Bog Dress
    Bronze Age
    Dance
    Dance Name
    Distaff
    Dyeing
    Embroidery
    Fiber Arts
    Flax Growing
    Food
    Glass
    Haberci
    Headcoverings
    Illumination
    Inspirations
    In The News
    Library
    List Of Links
    Machine Embroidery
    Metal Clay
    Mid Month Inspiration
    Migration Era/Iron Age
    My Documents
    Ottoman
    Ottoman Fabrics
    Pennsic
    Publications
    Research
    Rigid Heddle
    Sca
    SCA Camping
    SCA Forestry
    Sca Name
    Sca Newcomer
    Sewing
    Sheep
    Spinning
    Textile Charts
    Tips
    Totally Not SCA
    Viking
    Viking Bead Research
    Viking Costume: Beyond The Myth
    Viking Swatch Book
    Viking Textiles Looking Deeper
    Weaving
    Wool


      Email Updates

    Subscribe to Newsletter

    Blogroll of SCA & Costume Bloggers

    Below is a collection of some of my favorite places online to look for SCA and historic costuming information.

    More Amie Sparrow - 16th Century German Costuming


    Gianetta Veronese - SCA and Costuming Blog

    Grazia Morgano - 16th Century A&S

    Mistress Sahra -Dress From Medieval Turku 

    Hibernaatiopesäke

    Loose Threads: Cathy's Costume Blog

    Mistress Mathilde Bourrette - By My Measure: 14th and 15th Century Costuming

    More than Cod: Exploring Medieval Norway

    RSS Feed


Proudly powered by Weebly