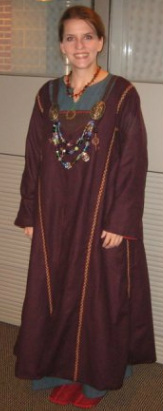
 Norse coat with herringbone stitching.
 http://awanderingelf.weebly.com/blog-my-journey/why-i-count-threads-sourcing-a-myth )
Embellishing garb (appropriately or not) is an SCA tradition. Embroidery, elaborate trimmings, fancy stitches... these things are infinitely appealing to most of us and perfectly acceptable within the Society.
Learning to embellish garb, however, is an art unto itself. Learning both appropriate methods for doing these decorative touches and when and where to use them for your persona can often involve long hours of research and even more time to perfect a technique for execution (and apparently I did not do enough research first for this one, lol, oh well, we live and learn).
I very much enjoy hand embellishing my Viking garb, even though my first attempts were very crude and I had a hard time coping with what I felt were very imperfect stitches. Learning to hand sew or embroider is much like anything else in that you have to develop the muscle memory needed to keep the stitches neat and even and you additionally have to develop an eye for spacing.
I also had to learn to let the little imperfections slide. Period stitches were not perfect (I believe someone even teaches a class on this at Pennsic!). And the more garments I embellished, the better my stitching got and while my handwork is still not perfect, I am more than happy to wear and display these items and to discuss some things that helped me craft better costumes.
I also have to note here that I am not a fan of practicing something just for the sake of practicing it. If it is using time and materials, I would prefer to still use my "practice" piece in the end. When I am learning a new stitch I try it a few times on a piece of scrap fabric and then typically apply it to a piece of older garb or a pouch or, well, anything that I can still use rather than stuff in a pile of samples. Would I try something totally new on my court garb? Likely not, but I will definitely make use of it somewhere until I am competent enough to use it to decorate my finery.
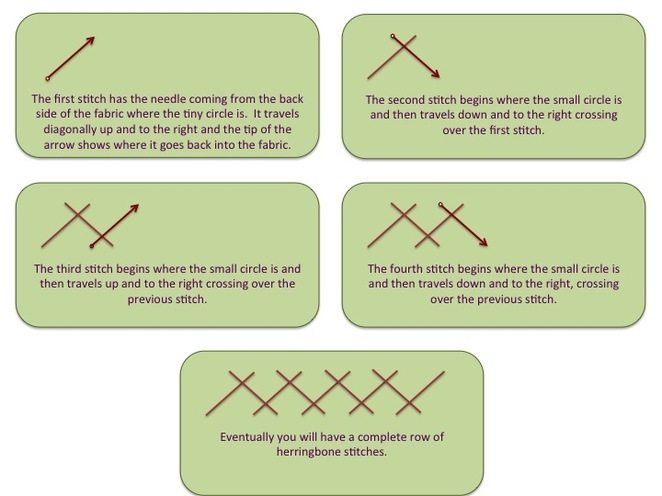
Below, is a diagram of the stitch for those who might be unfamiliar with it's structure.
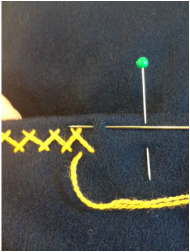
- To help keep the stitches appropriately spaced, and to help keep them neatly in line along the width of the row, do not stab the needle through the fabric in two motions (up from the back, and then down again from the top), but rather, insert the needle from the front to the back to the front all in one pass as detailed in the photo to the left.
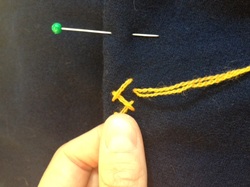
- Use something as a visual reminder of how wide the stitches should be kept. You can use chalk to mark the line on the fabric or, as in this photo, I am using the width of my thumbnail to measure how far I set the inside edge of the stitches from the hem.
- It is also possible to use a sewing machine to lay in a two even rows of basting stitches and use those as the outer guides for the herringbone stitches and remove the machine basting later.
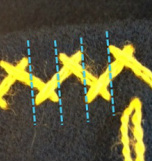
- To help keep the spacing of the cross even you can line up each new stitch with the end point of the stitch above or below it. (This can also help to keep the herringbone stitch compact as you sew, as there is a tendency in beginners to make each stitch a bit longer than the previous one until the pattern is somewhat sprawling in appearance.)
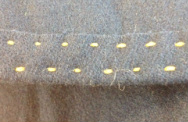
- Periodically look at the back of your project. You will see two parallel rows of stitching, which should be fairly consistent in length and in how far they are spaced.
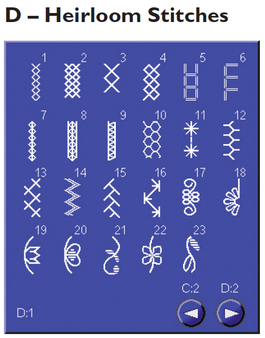
If you happen to have a sewing machine that allows for very wide stitches and that has a series of building complex stitches, you can try this cheat to help develop the muscle memory for working with this stitch.
To the left is an image of the screen from a Husqvarna Designer SE. #13 is a Herringbone stitch. Now, stitched out I do not actually find this very convincing (even when done with wool machine embroider thread) because it actually breaks each segment of the stitch into smaller stitches. But, you can machine stitch on your fabric with thread that exactly matches your fabric or thread that exactly matches the hand stitching thread you plan to use (I find the former method actually hides the machine work better) and then use the machine sewn lines as a guide and sew over them by hand with your thicker hand sewing thread or yarn. The hand stitches should completely cover the machine stitches and render them invisible unless someone happens to turn the fabric over and look at the reverse.
Now, this method has a couple of drawbacks. One is that it is actually very slow as the machine can take time to stitch out a complex pattern like this. Another is that it will make that area of the fabric somewhat stiff. Finally, it takes an expert touch (which I do not have) to guide the machine evenly over seams (where the fabric is several layers thick) and this can have a tendency to distort the machine stitches and make them longer or shorter when crossing a seam line.
(The tan plaid fabric depicted further down was created by laying down a row of machine stitches first. I did a few pieces with a machine laid row as a guide and now now longer need that crutch to keep my rows of stitches in order.)
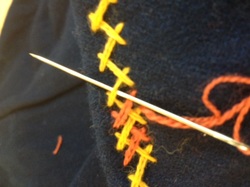
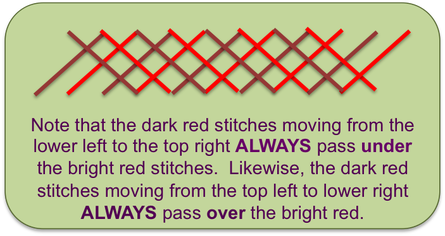
- Adding a second row of stitches, woven into the original one can look wonderful. (The key is to make sure that you always go over and under the same stitches as noted in my diagram below.)
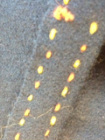
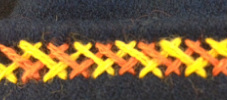
- While this stitch is often used to decorate a hem, a seam or one its own as a purely decorative element, it can also be functional. All of the stitch examples I have used above are red and yellow wool thread on very dark blue wool fabric. The stitches are actually hemming the fabric of an aprondress (both the top and bottom hem).
- Speaking of hems... a very compact herringbone can actually hide a machine sewn hem, especially if the yarn adds some sort of texture to the project that detracts from the machine stitching underneath.
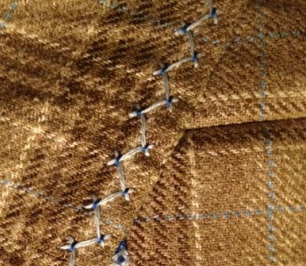
- Finally, I have to mention there are many ways (not necessarily period, but that are pretty) that you can further embellish a herringbone stitch. To the left you can see that I added a small stitch at each cross in a darker color. A few quick searches of the internet will yield many more options for additional elaboration!
 RSS Feed