I have made a couple of posts recently about rigid heddle looms in general and also how to use them for SCA projects. Because I think these are a great gateway to the weaving world, I plan to continue to add to those posts in hopes of helping new weavers make use of these tools.
In the SCA time period, a good deal of the textiles were wool. In some areas and times it was the predominant fiber type and often individuals seeking to upgrade their look start looking to add wool garments into their kit.
Fortunately, wool is a great material for weaving! Wool has a natural give and does not require high tension to bewoven (some fibers, like linen need to be at a high tension for it to behave on the loom). Of course, not all wool is created equal and many that are nice for weaving can stump the new artisan when problems do arise. Here are a few tricks that might help the new rigid heddle weaver have a better experience with wool.
- Use a tried and true wool for your first time working with this fiber if possible. Harrisville Shetland comes in unwashed cones in a nice range of colors. This yarn (as opposed to it's washed form, which you can buy on skeins) has a smooth finish with few stray fibers. It allows for easy warping and a clean shed. You can find this yarn at many stores online and a 10 dent heddle is perfect for weaving this yarn into plain weave cloth: https://halcyonyarn.com/yarn/0094080C/harrisville-shetland-yarn-_-unwashed-cones It makes a medium to heavy fabric that would be good for a cloak, hood, pouches, blankets. It could even work for a heavy garment. It also fulls well after weaving if you need fulled fabric for your project. (Fulling is a process that uses water, agitation and heat to shrink the cloth while locking the fibers together to make a thick cloth that both sheds water and is very insulating.)
- Hand spun, softly twisted yarn and single ply yarn can sometimes be problematic to even an experienced weaver.
| 
|
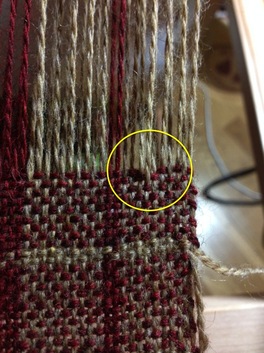
 The back of the stick shuttle pressing towards my finished weaving allows me to see which threads are truly on top, and can let me see a potential error before I make it.
 The other reason to wrap only on one side is that you can then use the clear side of the shuttle to press press towards you occasionally to verify that all threads are where they are supposed to be and you are not skipping a thread because it is not rising as it should. A good tutorial for wrapping can be found at this link - though note that rigid heddle weaving I prefer to wrap it only on one side. http://askthebellwether.blogspot.com/2009/12/how-do-you-wind-on-stick-shuttle.html#.VLleOSeoA6E
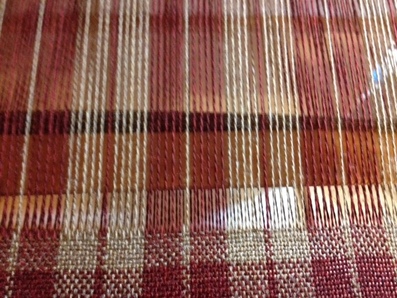
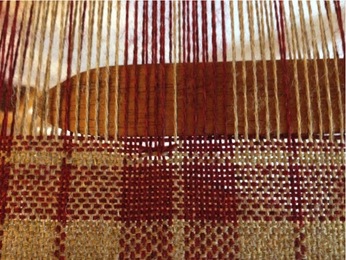
- Eventually you might want to use a more fine yarn to create a suitable cloth for garments that will not be too thick or war. For this you will need to use a smaller heddle or possibly two heddles to create fine cloth. Sometimes you will encounter yarns that want to stick to each other, causing the shed to not open properly. You can see in the image above that on the right hand side of the weaving some of the threads do not pop up to the top the way the rest do. This is because the fuzzy, loose fibers of this particular yarn (KnitPicks Palette Yarn) can cling to their neighbors and prevent them from moving as they should when the shed is changed.
There are two solutions for this problem. The first is to check your tension. Wool stretches over time, and sometimes you will need to tighten the tension on the loom (just turn the front beam one notch tighter if you think this is the case). If I see that a good many threads are doing this, tension is usually the culprit. You will see most of them move into proper alignment when you tighten the beam.
Occasionally, you will have one thread that is just tensioned as well as the other threads. If you are already too far into your weaving to retie that one, you can take a paper clip or metal shower hook (or even a loop of yarn) with some nuts or washers added as weight and hook it over the offending thread at the back of the loom. This extra weight will cause that thread to tighten up. It might take some experimentation to get the right weight so that it matches the surrounding threads, but it is a very simple fix.
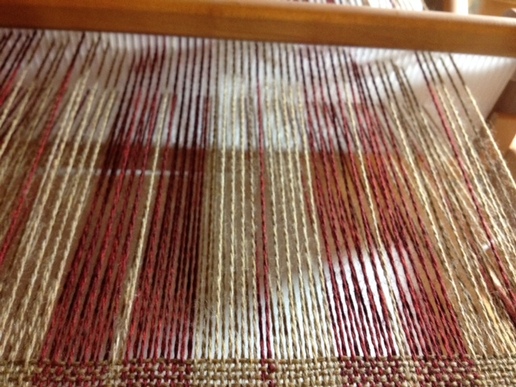
Sometimes adjusting the tension does not help, or only helps a bit. This can be the case with a very, very sticky yarn. The best thing to do here is to periodically clear the shed yourself. You can do this by inserting another stick shuttle, a weaving sword or a pick-up stick in the shed and pressing a way from the rigid heddle with it - it will force the yarns to move apart. You can see that in the image below. I insert the stick into the warp and move it towards me a small group at a time. I have to do this periodically with the KnitPicks Yarn as it is both stretchy and clingy. If you do not have a clear shed, it can lead to errors in the weaving.
Note: If your yarn is sticky and you do have to unweave a portion to correct it, you might have to clear EVERY shed as you reverse it as the yarn will start to grab and lock in place when you beat it.

- And of course, you will always have errors. Some may require unweaving if you cannot live with them (though I will admit that fulling fabric can help conceal them). In a woolen tabby (plain weave) they will show as longer threads floating over the surface of the weaving. You can correct these by reversing your steps and undoing each row of weft until you are back to the row with the error. As I mentioned earlier, you might have to clear the shed with a pick up stick (or any beveled, smooth piece of wood) as you go.
| 
|
 RSS Feed